You're probably dealing with some version of the same mess most event teams create by accident.
Registrations come in through email replies, WhatsApp messages, DMs, a spreadsheet someone “cleaned up,” and a payment note that lives in somebody's inbox. Two days before the event, nobody is fully sure who's confirmed, who still needs a ticket, which guests selected workshops, or whether the front desk will be checking names against the right list.
That setup works for very small events until it suddenly doesn't. The failure usually shows up on event day. A guest says they registered. Another says they paid. Staff search three places. Someone gets waved through without verification. Someone else waits in line while the team tries to reconcile notes.
A good event registration form template fixes more than the sign-up page. If you build it properly in Google Workspace, the form becomes the front end of a full operating system: registration, clean data capture, ticket creation, QR delivery, and live check-in from a shared Google Sheet. That's the part most guides skip, and it's the part that saves the most time.
Table of Contents
- Why Your Old RSVP Method Is Holding You Back
- Designing Your Google Form for Maximum Data Capture
- Handling Multiple Sessions, Roles, and Ticket Tiers
- From Form Submission to QR Code Ticket
- Preparing for Onsite and Offline Event Check-In
- Privacy, Payments, and Final Customization Tips
Why Your Old RSVP Method Is Holding You Back
The old RSVP method usually looks harmless at first. A team sends an invite, asks people to reply, and tracks names in a spreadsheet. Then someone adds dietary notes in a second tab. Another staff member tracks paid guests in a different file. By the time the event gets close, nobody trusts the numbers.
That problem gets worse on mobile. A lot of attendees register while commuting, between meetings, or from a phone at home. A 2023 Eventbrite analysis found that forms with fewer than 10 required fields achieve completion rates 25% higher than those with 15 or more, and mobile drop-offs account for 53% of all registration abandons. If your current RSVP process asks people to email details manually or fill in a long form, you're creating friction before the event even begins.
The practical fix isn't always buying another platform. For many teams, the fastest improvement is using Google Forms and Google Sheets properly. Most organizations already have Google Workspace. That means you can standardize sign-ups, collect structured data, and stop rebuilding the process every time you run a seminar, fundraiser, training day, or community event.
Practical rule: If staff have to copy attendee data by hand from one tool to another, the system is already too fragile.
I've seen planners lose more time reconciling “almost matching” lists than they would've spent building one solid template at the start. A proper form forces consistency. It makes attendees choose from the right ticket types, enter details in the same format, and land in one shared sheet that the whole team can trust.
Before you build the form, it helps to align the rest of the event workflow too. A simple event planning checklist template is useful for catching the operational details that the form depends on, like venue timing, staffing, equipment, and access control.
What doesn't work is treating registration as an isolated admin task. Registration affects catering counts, badge printing, room capacity, session planning, payment follow-up, and check-in speed. Once you see it that way, the form stops being a document and starts becoming infrastructure.
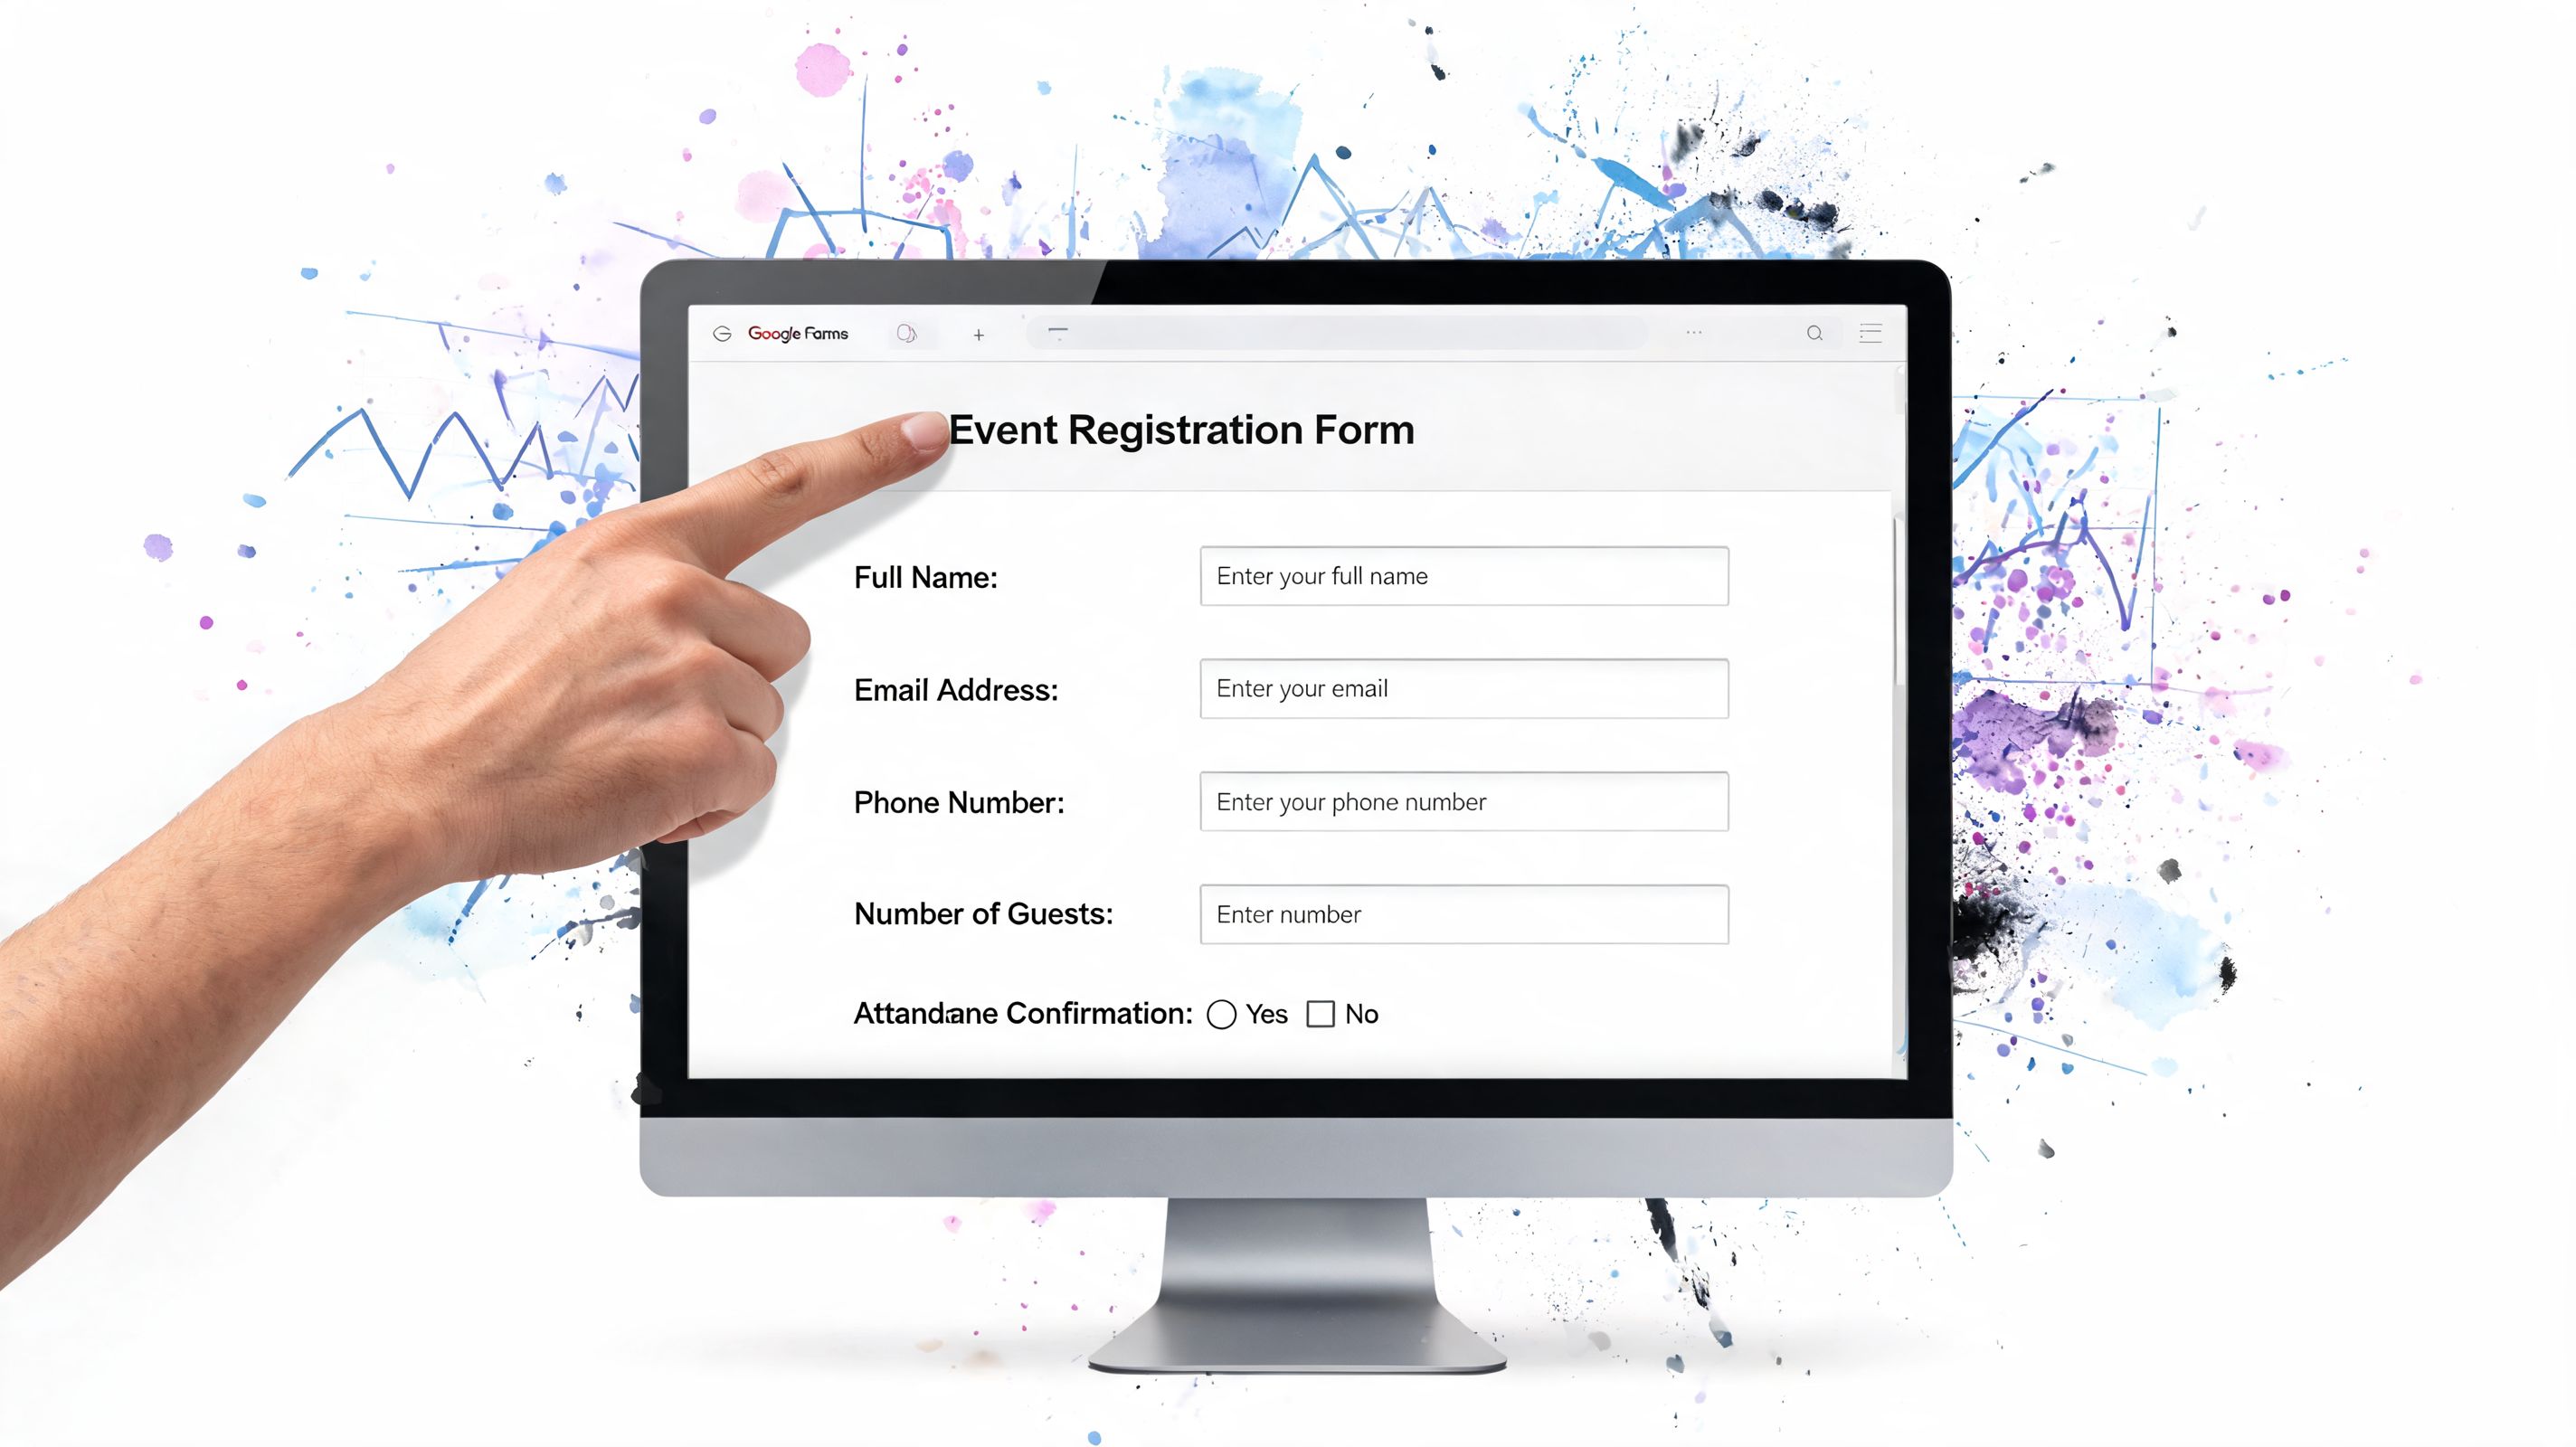
Designing Your Google Form for Maximum Data Capture
A strong event registration form template doesn't ask for everything. It asks for the minimum needed to confirm attendance, route the person correctly, and support event-day operations.
Start with the smallest useful form
Open Google Forms and create a blank form. Name it with a reusable structure such as:
- Event name
- Event date
- Registration status version
That sounds minor, but it matters later when staff duplicate forms and need to know which one is live.
For the first build, keep the required fields tight. Research summarized by FlexSubmit shows that each additional field can reduce completion by 5-15%, and the best approach is to capture minimal essential information at registration, such as name and email, then collect extra detail through follow-up messages later.
In practice, the first version of the form should usually include:
- Full name
- Email address
- Ticket type or attendance type
- Session choice, if the event requires pre-selection
- Accessibility or dietary needs, if they affect operations
That's enough for many events. It's not enough for every stakeholder who wants data. Those are different things.
The easiest way to damage form performance is to let every internal team add “just one more field.”
Build fields in the order staff will use them
Field order affects completion and data quality. Google Forms makes it easy to drag fields around, so use that flexibility.
A good sequence is:
- Identity first. Name and email.
- Attendance decision next. Ticket type, role, day, or session.
- Operational needs after that. Accessibility, meal preferences, support requests.
- Nice-to-have questions last. Marketing source, organization size, networking preferences.
Why this order works is simple. People answer faster when the first questions are obvious and low-effort. If you put the most complicated choices first, some users quit before they understand the event structure.
If you want a starting point for form layout and examples, this Google Forms registration template guide is a useful reference for structuring a reusable setup.
Choose optional fields by event type
Not every event needs the same template. A nonprofit gala and an internal training session shouldn't collect identical information.
| Event Type | Essential Fields (Required) | Smart Optional Fields |
|---|---|---|
| Conference | Full name, email, ticket type, session selection | Company, job title, dietary needs, networking preferences |
| Nonprofit gala | Full name, email, ticket type or table selection | Guest names, meal preference, donation note |
| Internal training | Full name, work email, department, session choice | Manager name, accessibility needs, follow-up interest |
Use optional fields when the answer improves planning without blocking registration. That distinction matters. If the event can still function without the data, the field probably shouldn't be required.
Later in the process, you can send a segmented follow-up form to confirmed attendees only. That's a cleaner way to collect workshop materials, travel details, or deeper profile information.
A quick walkthrough helps if you're building this for the first time:
Add validation before bad data spreads
Google Forms won't behave like a full custom app, but you can still prevent common problems.
Use these checks early:
- Require email format so follow-up messages don't fail.
- Use dropdowns for fixed options like ticket tier or attendance day.
- Use multiple choice instead of short answer when staff need consistent reporting.
- Split long forms into sections so attendees don't face one giant page.
If you need tighter front-end email handling for custom workflows around your form, Truelist's developer guide for email verification is a practical technical reference.
What doesn't work is leaving key operational choices in open text fields. “VIP,” “vip ticket,” and “premium guest” may mean the same thing to a human, but they create cleanup work in Sheets and confusion when you generate tickets later.
Handling Multiple Sessions, Roles, and Ticket Tiers
Simple RSVP forms break down when one event serves different audiences. Conferences have workshops. Fundraisers have sponsors, tables, and VIP access. Internal events have speakers, staff, and attendees moving through different doors.
Google Forms can handle more of that complexity than many anticipate, as long as you use sections and branching carefully.
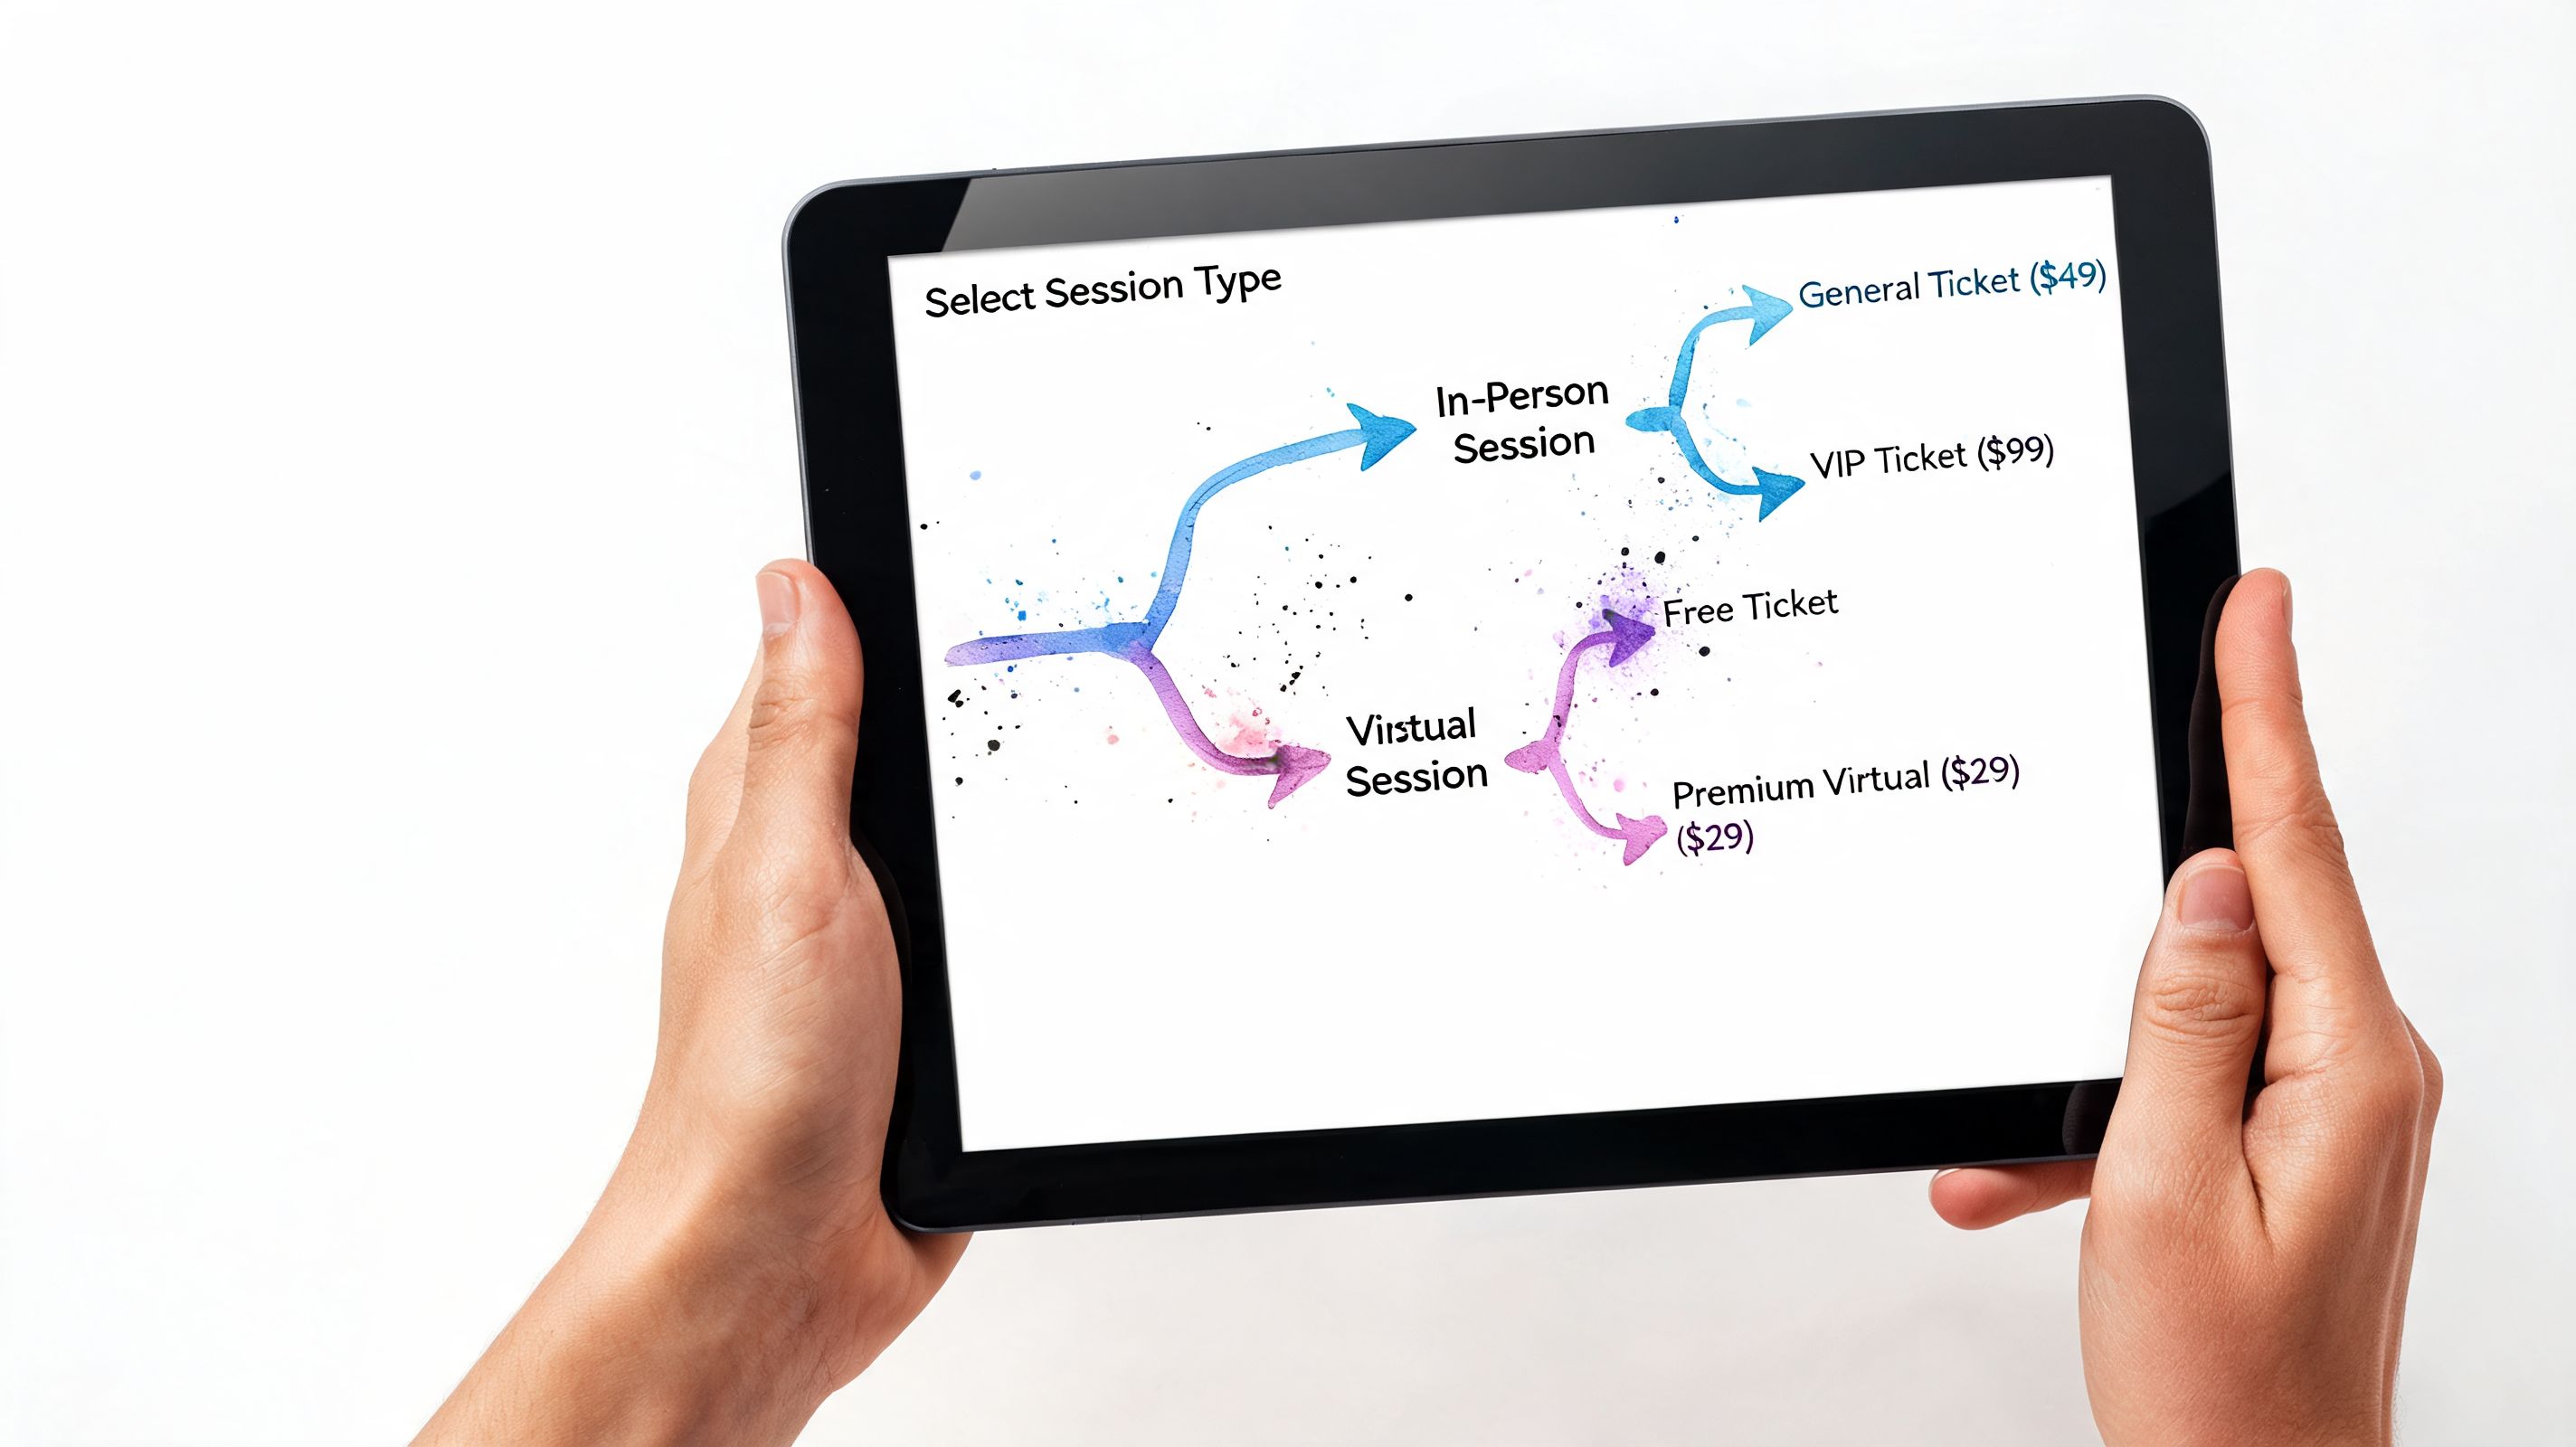
Use sections to branch the form
The key feature is Go to section based on answer. In Google Forms, that lets one answer lead people to different question paths.
A practical setup looks like this:
- If the attendee selects VIP Ticket, send them to a section with meal choice, lounge access notes, and premium session options.
- If they select General Admission, skip those questions and move them straight to the confirmation section.
- If they select Speaker, route them to a section asking for presentation title, arrival time, and AV needs.
That keeps one form usable for several attendee types without forcing everyone through every question.
Map access rules before you build
Many teams make avoidable mistakes. They build the form first, then try to infer access rights from messy answers later.
Write the access logic down before touching the form. Use plain language.
For example:
- Day 1 ticket gets entry on Friday only
- Workshop A pass includes breakout room A and lunch
- Sponsor badge includes early setup access
- Volunteer role includes staff entrance, not guest seating
More events now have layered access. According to Venngage's registration form guide, there has been 35% growth in multi-day conferences, 52% now offer a hybrid component, and poor permission handling causes over-admission errors at 18% of corporate events. If your form doesn't define roles and access cleanly, the ticketing and check-in process becomes guesswork.
Don't ask attendees to describe their own access. Give them structured choices that map directly to operations.
Keep one master form when possible
Teams often create separate forms for VIPs, students, staff, sponsors, and speakers. That can work, but it usually creates reporting problems and duplicate admin.
One master form is usually better if:
- the event shares one attendee database
- staff need one view of registrations
- tickets will be generated from one sheet
- different attendee paths can be handled with conditional logic
Separate forms are still useful when the workflows are materially different. A speaker submission process isn't the same as attendee registration. A vendor onboarding form may need business information, delivery timing, and setup permissions that regular guests never see.
The test is simple. If two groups will be checked in from the same list and need the same ticketing flow, keep them in one form unless complexity becomes unmanageable.
From Form Submission to QR Code Ticket
Most articles stop at form design. That's only half the job.
A registration form is useful. A registration system is what happens after submit. The missing piece is turning each response into a ticket that staff can verify quickly and reliably at the door.
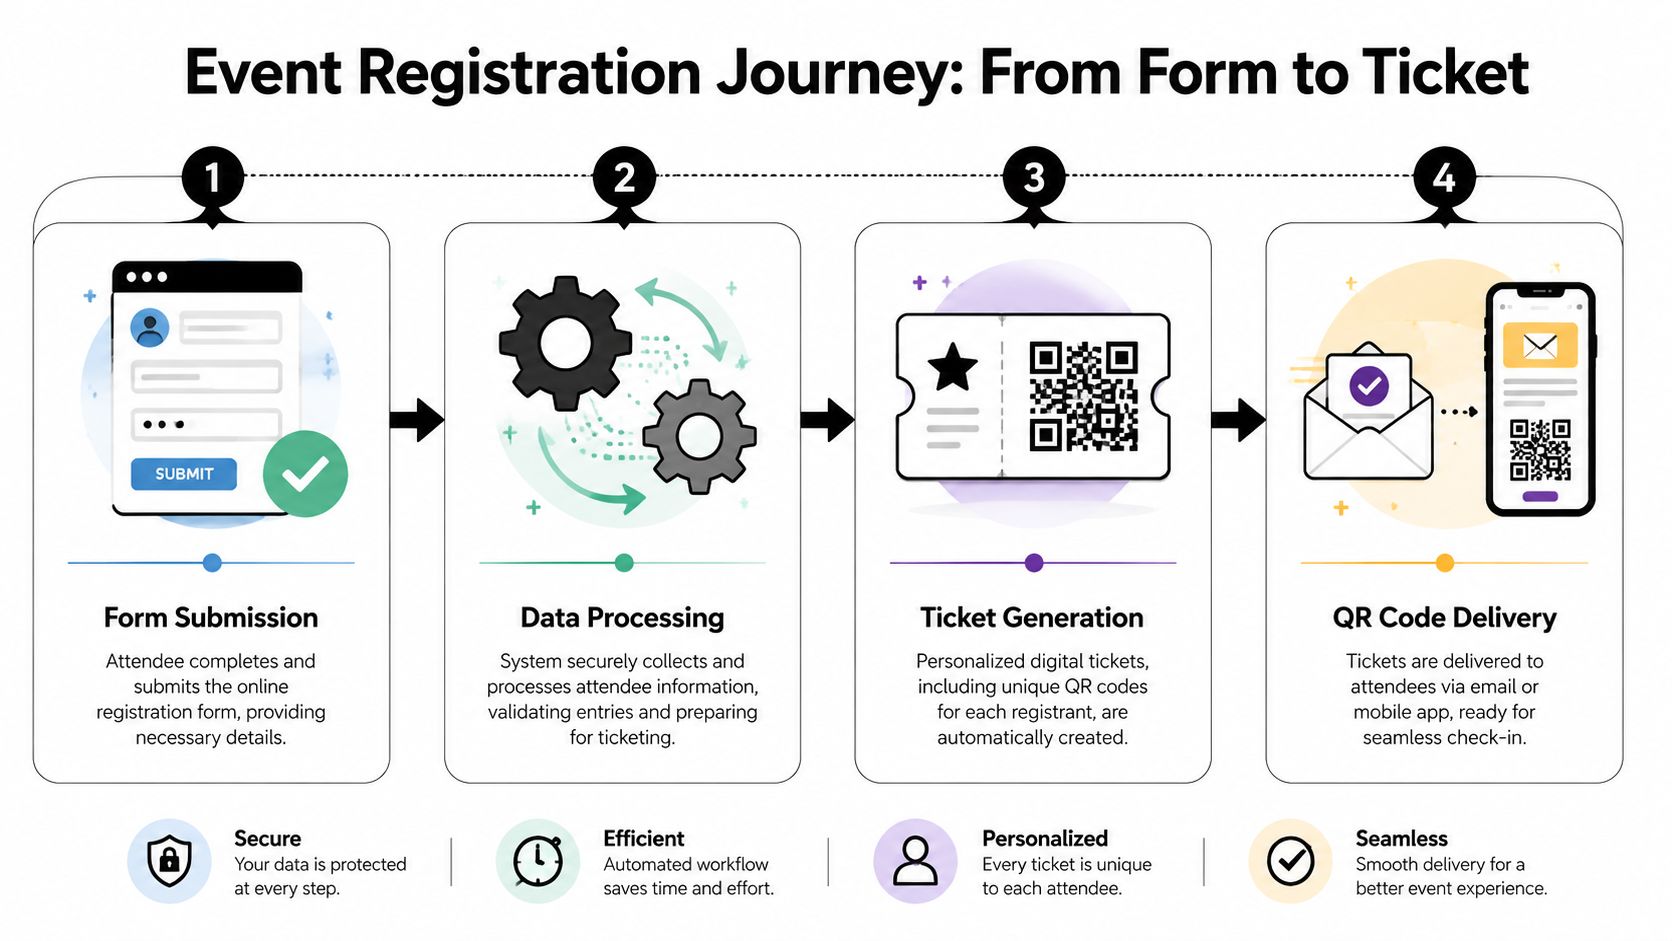
Your Google Sheet becomes the source of truth
When you connect a Google Form to Google Sheets, every submission lands in a row. That sheet should become the master record for registration status, ticket status, and check-in status.
This is the workflow many teams miss. Existing guides tend to focus on the form itself, but Bizzabo's template discussion highlights that the post-registration workflow is often ignored, even though 70% of event planners report problems caused by fragmented tools, and integrated add-ons can cut costs by up to 80% compared with traditional platforms.
That matters because the operational handoff is where errors usually start. If form submissions live in one tool, ticket generation happens in another, and check-in data lives somewhere else, the team spends event week chasing mismatches.
For a practical example of this connected workflow, this Google Forms QR code registration guide shows how organizers turn form responses into a usable registration pipeline.
Generate tickets from sheet rows
Once your sheet has clean columns, each row can drive ticket creation.
The logic is straightforward:
- A registration arrives in the sheet.
- The system reads key fields such as name, email, ticket type, session, and access zone.
- It creates a ticket with a unique QR code tied to that record.
- It marks the ticket as generated so staff don't duplicate sends.
The best part of this approach is that ticket content can pull directly from the form data. If someone selected Day 2 only, the ticket can reflect that. If they're VIP, that designation can appear on the ticket and later inform scanning rules.
What works well in practice is using stable columns and resisting the urge to rename them mid-campaign. Once ticket automation is tied to a sheet, field discipline matters. “Ticket Type” and “Access Level” sound similar, but if one controls branding and the other controls entrance permissions, mixing them up creates bad tickets.
Distribute tickets without leaving Google Workspace
Once the tickets exist, distribution should still point back to the same system.
Good options include:
- Email delivery for formal confirmations and PDF tickets
- WhatsApp delivery when your audience responds better to mobile messaging
- Manual resend from the sheet for attendees who claim they didn't receive the first message
A useful setup includes a status column for each step:
| Registration Received | Payment Confirmed | Ticket Generated | Ticket Sent | Checked In |
|---|
That single sheet view helps staff answer real questions fast. Has this person registered? Paid? Received a ticket? Already entered the venue?
The trade-off is that free tools won't give you every feature a large enterprise platform offers out of the box. You have to define the workflow cleanly, maintain the sheet carefully, and test the automation before launch. In return, you get a low-cost system that many teams can run with tools they already know.
Preparing for Onsite and Offline Event Check-In
A QR code ticket only solves half the entrance problem. The other half is scanning it quickly under real venue conditions.
That means bright sunlight at an outdoor gate, low light in a theater lobby, weak Wi-Fi in a school hall, and three staff members checking in guests at once while late arrivals ask questions. Your check-in method has to survive that environment, not just look good in a demo.

Test the real entrance workflow
A MightyForms guide on event registration best practices notes that mobile devices account for the majority of registration traffic, and rigorous testing across devices and networks can reduce form abandonment rates by 30-50%. The same source also notes that QR codes should be at least 100x100 pixels for reliable scanning in varied venue lighting.
That last detail matters more than people expect. A beautifully branded ticket becomes useless if the QR code is too small, low contrast, or buried under design elements.
Before doors open, test:
- Different phones and tablets used by your staff
- Different ticket delivery formats such as PDF and image
- Screen brightness conditions indoors and outdoors
- Printed copies for guests who arrive with paper tickets
- Weak connectivity scenarios if the venue internet is unstable
Use the exact devices staff will carry at the entrance. Testing on one office laptop tells you almost nothing about live check-in.
If you want more examples of how teams apply scanning workflows at events, Scanely's event management use cases provide helpful operational context.
Plan for weak internet and multiple scanners
Free and low-cost systems hit their limit fastest at the door. The issue usually isn't form creation. It's whether several staff can validate entries quickly while keeping one accurate attendance record.
A workable setup needs:
- Real-time sync back to the master sheet when internet is available
- Offline-capable scanning when connectivity drops
- Multiple devices scanning simultaneously without creating duplicate admits
- Visible check-in status so staff know whether a ticket was already used
The registration template and the access logic you built earlier start paying off. If the ticket already carries the right attendee type and permissions, the scanner only needs to validate instead of forcing staff to make judgment calls.
A practical reference for that operational side is this QR code event ticketing and access control guide, which focuses on controlling entry rather than just issuing tickets.
Keep paper backups even if you expect a digital flow
Digital-first doesn't mean digital-only.
For any event with meaningful attendance, keep:
- a printed alphabetical list
- a printed VIP or special-access list
- blank badges or labels
- one staff member assigned to exception handling
That backup doesn't replace scanning. It protects the entrance from stopping when a guest arrives with a dead phone, a cracked screen, or the wrong email address. The most reliable check-in teams use digital as the default and paper as contingency, not as a competing system.
Privacy, Payments, and Final Customization Tips
Handle consent clearly
If your form collects personal information, add a clear privacy note and link to your privacy policy in the form description or confirmation area. If you're collecting dietary or accessibility information, make it obvious why you need it and who will use it.
For photo-heavy events, include a consent checkbox or a note about event photography. Keep that language plain. People should understand it quickly without reading a policy document like a contract.
Keep payments simple
Google Forms doesn't replace a full payment platform by itself. For many events, the cleanest workaround is to send people to a Stripe or PayPal payment link in the form confirmation message or in the follow-up email tied to their registration.
That works well for small and mid-sized events when you don't need deep ecommerce features. The main discipline is matching payment status back to the registration sheet so ticket generation only happens for approved records when required.
Reuse the template without carrying old mistakes forward
Once you've built one solid form, save it as your house template. Duplicate it for the next event, then review these items before launch:
- Field relevance. Remove questions that no longer serve operations.
- Choice accuracy. Update ticket tiers, sessions, and dates.
- Sheet structure. Keep stable column names for downstream workflows.
- Confirmation text. Make sure attendees know what happens after submission.
- Test submissions. Run several fake registrations before sending the live link.
A good event registration form template should feel boring to staff by the third event. That's a good sign. It means the process is stable, predictable, and easy to run.
If you want to turn Google Forms and Google Sheets into a complete QR ticketing and check-in workflow without moving your team into a new dashboard, Darkaa is built for that job. It lets you generate branded QR tickets, send them in bulk, and run live or offline check-in from the same Google Workspace setup your team already uses.