You're probably here because the event is real, the deadline is close, and buying a full ticketing platform feels unnecessary for what you need right now. Maybe it's a school performance, a fundraiser, a workshop, a church event, or a client event with a manageable guest list. You need tickets that look legitimate, can be shared fast, and won't turn check-in into chaos.
A Google Docs ticket template is a practical starting point because it keeps the design work simple and familiar. But the useful version isn't just a static Doc you edit by hand. The stronger setup is a small Google Workspace system: Google Docs for the layout, Google Sheets for attendee data, and QR codes for validation at the door. That combination gives you a lightweight process that works well for many real events, as long as you understand where the DIY method helps and where it starts to strain.
Table of Contents
- Why Use Google Docs for Event Tickets
- Designing Your Reusable Ticket Layout
- Connecting Google Sheets for Data and Unique IDs
- Generating QR Codes and Merging Tickets in Bulk
- Ticket Distribution and Day-Of Check-In Strategy
- When to Upgrade from a DIY Template
Why Use Google Docs for Event Tickets
The usual starting point is a simple request. Someone needs tickets by Friday, the budget is tight, and the team already works in Google Workspace. In that situation, Google Docs is a practical place to build the ticket itself because it is fast to edit, easy to share, and familiar to almost everyone involved.
That only solves the design side.
For event work, a ticket is usually two things at once. It is a printable layout for the guest, and it is a record you need to track. Google Docs handles the layout well. A connected Google Sheet handles the record keeping. That split is what turns a basic template into a workable DIY ticketing system instead of a stack of manually edited files.
Google's own framework includes event pass templates, which confirms that template-based ticket structures are part of the wider Google ecosystem, not just an improvised shortcut (Google Wallet event pass templates). Smaller teams benefit most from that approach because they can build a repeatable ticket process without buying design software or a full ticketing platform on day one.
What Google Docs gets right
Docs works well for event tickets because it removes a lot of day-to-day friction:
- Familiar editing: Staff can update event details, swap logos, and fix text without training.
- Shared access: Coordinators, volunteers, and admins can review the same file and keep one approved version.
- Reliable output: Exporting to PDF keeps formatting stable for print and email attachment.
- Reusable setup: Once the ticket layout is approved, you can copy it for the next event instead of rebuilding it.
I use Docs for the part guests see. I do not use it as the system of record.
Practical rule: Keep the ticket design in Docs. Keep attendee data, unique IDs, and status fields in Sheets.
Where the plain Doc approach falls short
A plain Google Doc starts to break down as soon as each ticket needs its own identity.
| Limitation | What happens in practice |
|---|---|
| Manual personalization | Staff copy names, seat details, or order info one ticket at a time |
| Weak validation | Duplicate numbers and mismatched attendee details are easier to miss |
| Messy updates | Late changes create multiple versions and unclear print files |
A static Doc can handle a short batch of generic admission tickets. Once you need unique ticket numbers, QR codes, or check-in tracking, the workflow must start in Docs and move into a connected Sheet. That is an advantage of this Google-based setup. You keep the simplicity of a document template, then add just enough structure to generate individualized tickets in bulk.
That approach has limits, and it is better to be honest about them. For a school play, fundraiser, workshop, or internal company event, Docs plus Sheets can be enough. For reserved seating across multiple sessions, live inventory control, refunds, transfer rules, or high-volume check-in, a DIY template will eventually cost more staff time than it saves.
Designing Your Reusable Ticket Layout
The master ticket should be clean before you automate anything. If the layout is sloppy, bulk generation only produces sloppy tickets faster.
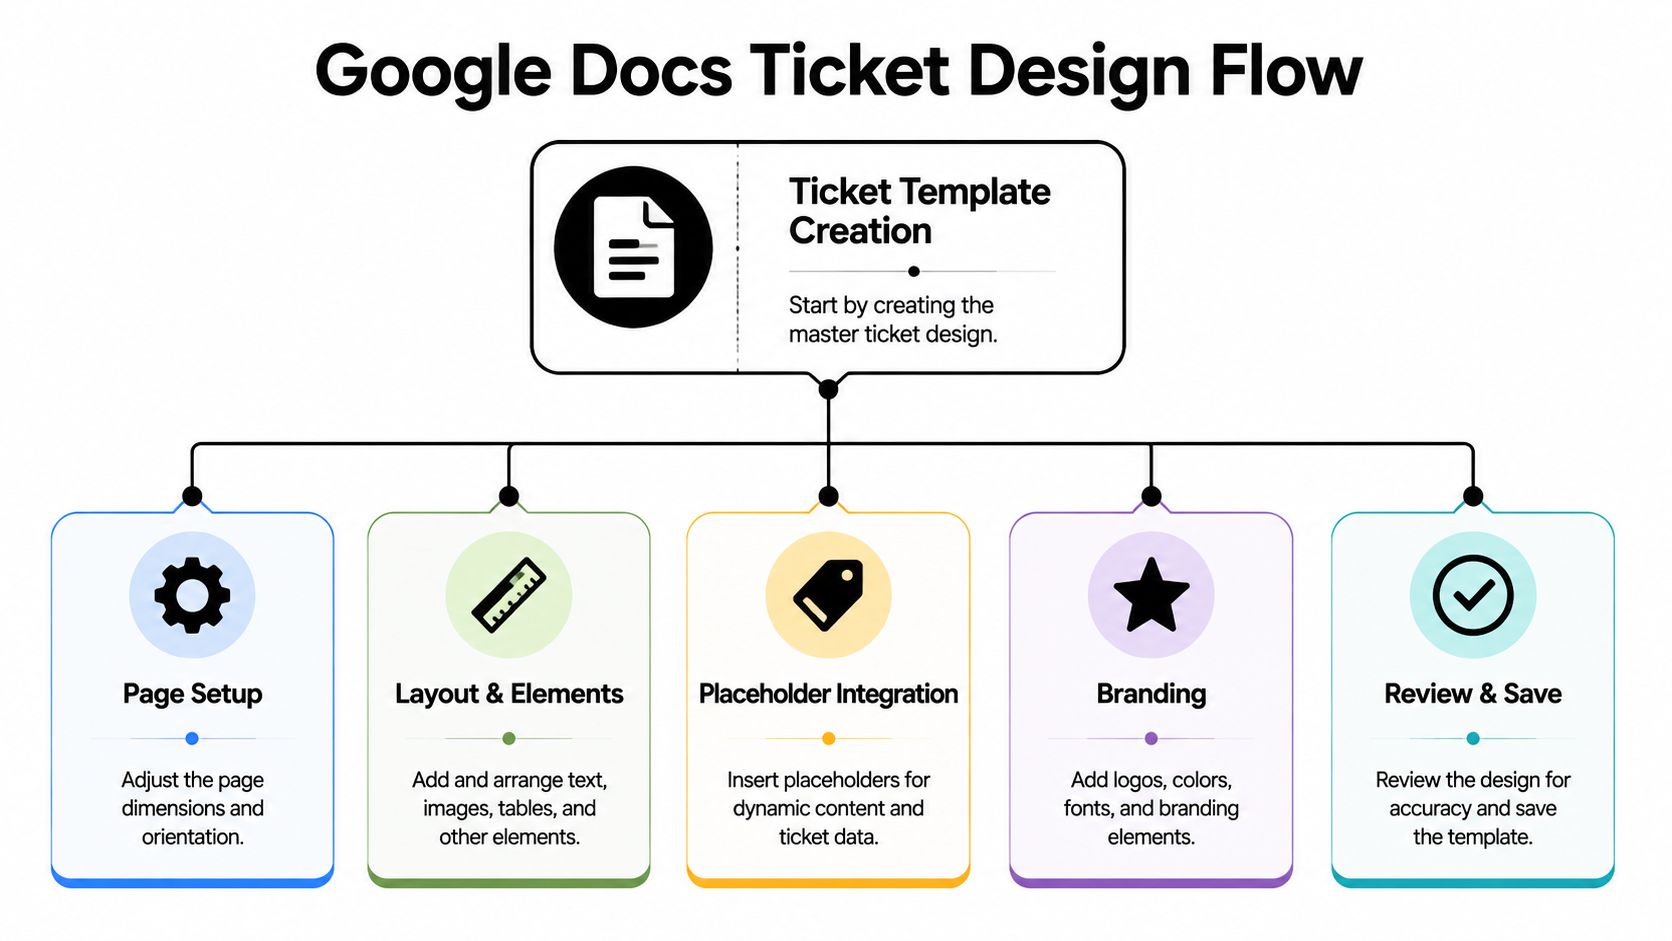
Start with the print format
Open a blank Google Doc and set it up like a printable object, not like a letter. Use File > Page setup and choose a ticket-sized page that matches how you plan to print. If you're printing single tickets, set the page close to the physical ticket size you want. If you're printing several per sheet, build the layout inside a table so spacing stays consistent.
For most DIY setups, I prefer using a table with hidden borders. It gives you more control than trying to space text manually. A simple structure keeps logos, text blocks, QR placeholders, and notes from drifting out of alignment.
A solid build method for event-style tickets is to place the event name at the top, put date, time, and venue in the middle, and use the bottom area for the seat number, QR code, and special notes. It's also smart to export the final file to PDF to preserve formatting for print. Readable fonts such as Arial, Open Sans, or Poppins help keep the result clean and easy to scan by eye (Google Docs ticket layout method).
Place the right details in the right spots
Think about the ticket the way a guest reads it at the door.
The top area should carry the identity of the event. Put the event name there, and if you have a logo, keep it nearby. The middle should answer the guest's practical questions: when is it, where is it, and what does this ticket grant access to. The bottom should handle operational details.
Use this content order:
Top block
Event name, logo, and short event label if needed.Middle block
Date, time, venue, and entry instructions.Bottom block
Ticket ID, attendee name, seat or access level, QR code placeholder, and any short note such as “bring ID” or “arrive early.”
Keep the branding simple. One logo, one accent color, and one readable body font usually print better than a heavily decorated design.
Build for repetition, not perfection
The biggest mistake in a Google Docs ticket template is designing for one ticket instead of for a full run. You want a layout that survives repeated output. That means:
- Consistent alignment: Don't eyeball spacing. Use table cells.
- Safe margins: Leave enough room so nothing gets clipped when printed.
- Predictable placeholders: Reserve exact locations for the fields that will change later.
- No fragile styling: Avoid overly tight spacing, layered graphics, or anything that breaks when text length varies.
If you know names or access labels may be long, test with awkward examples before you finalize the template. A design that only works with short names isn't reusable.
Connecting Google Sheets for Data and Unique IDs
The ticket design is the shell. Google Sheets is the operating layer. Once you move attendee data into a spreadsheet, you stop treating each ticket as a separate design file and start treating tickets as records.

Google-based ticketing has clearly moved from manual numbering to spreadsheet-driven automation. That shift matters because it turns a static document into a scalable workflow for assigning unique ticket IDs from a single source of truth, reducing duplication risk and making validation faster at admission (Google Sheets and Docs ticket workflow).
Build the sheet like an operations file
Set up the sheet so one row represents one attendee or one ticket. Don't overcomplicate it. Start with the fields you will use.
A practical ticket sheet usually includes:
| Column | Purpose |
|---|---|
| FullName | Printed name on the ticket |
| Delivery destination | |
| TicketID | Unique identifier |
| Status | Invited, sent, checked in, cancelled |
| AccessLevel | General, VIP, staff, backstage, session pass |
| Notes | Internal handling notes |
If your event has seat assignments, add a seat column. If it has sessions, add separate columns for session access rather than trying to cram everything into a notes field.
If you're planning a social event with lots of household-level coordination, a resource like this essential wedding guest list guide is useful for thinking through guest grouping, RSVP handling, and list hygiene before you ever generate tickets.
Keep one row equal to one ticket
That rule prevents confusion later. If two guests share one booking, don't keep them trapped in a single cell unless they intend to use one shared pass. For check-in, scanning, and re-sending, one person per row is cleaner.
In this scenario, add-ons begin to earn their place. A merge tool can connect your sheet columns to your Doc placeholders and generate ticket output without hand editing. If you want a row-based workflow, this guide to QR code tickets for Google Sheets with one ticket per row is a direct fit for the system you're building.
A short walkthrough helps if you want to see the sheet-first setup in action:
A shared spreadsheet is only useful if your team agrees that it is the master record. Once people start keeping side lists, ticket errors multiply.
Generating QR Codes and Merging Tickets in Bulk
This is the point where the Google Docs ticket template becomes a real ticketing system. Your Doc holds the layout. Your Sheet holds the values. The merge process combines them into personalized tickets at scale.
Use placeholders that match your sheet
In the Google Doc, insert placeholders that mirror your spreadsheet headers. If your sheet has columns called FullName, TicketID, and AccessLevel, your template should use those exact field names in placeholder form, such as {{FullName}}, {{TicketID}}, and {{AccessLevel}}.
That naming discipline matters. Merge tools don't guess well. They map fields exactly.
A practical template might include placeholders like:
- Identity fields such as
{{FullName}}and{{Email}} - Operational fields such as
{{TicketID}},{{Seat}}, or{{AccessLevel}} - Event fields such as
{{EventName}},{{EventDate}}, and{{Venue}} - Validation field for the QR code image or encoded ticket value
For support-style tickets rather than event admission, the useful fields are different. Guidance from InvGate recommends structuring ticket records around subject, description, category or subcategory, priority, requester information, and attachments, because those fields help teams categorize, prioritize, assign, and resolve issues without chasing missing details (support ticket field structure). That's a good reminder that template quality always depends on field quality.
Choose the right bulk output
Once the placeholders are in place, use an add-on that can read the sheet, populate the Doc, and create a unique QR code for each row. The QR code usually carries the ticket ID or another verification value that your check-in workflow can validate later.
This is the stage where a tool built for QR code for event tickets saves a lot of labor. Instead of manually editing one ticket at a time, you can generate personalized outputs in bulk and keep the ticket record tied to the attendee row that created it.
There's also a practical delivery choice to make:
| Output method | When it works well | Weak point |
|---|---|---|
| PDF attachment by email | Formal events, print-friendly delivery | Requires good email data |
| Image ticket | Fast mobile sharing | Less ideal for printing |
| Manual download and send | Small lists, special handling | Time-consuming at scale |
If you want to keep the whole workflow in Google Workspace, one option is Darkaa, which turns Google Sheets and Google Forms into QR code ticket generation and check-in workflows. It can merge attendee data into branded ticket files and distribute them through bulk email or WhatsApp while keeping the source data in Sheets.
Don't encode too much into the QR itself. A unique ticket ID linked to your sheet is usually easier to manage than stuffing every attendee detail inside the code.
Ticket Distribution and Day-Of Check-In Strategy
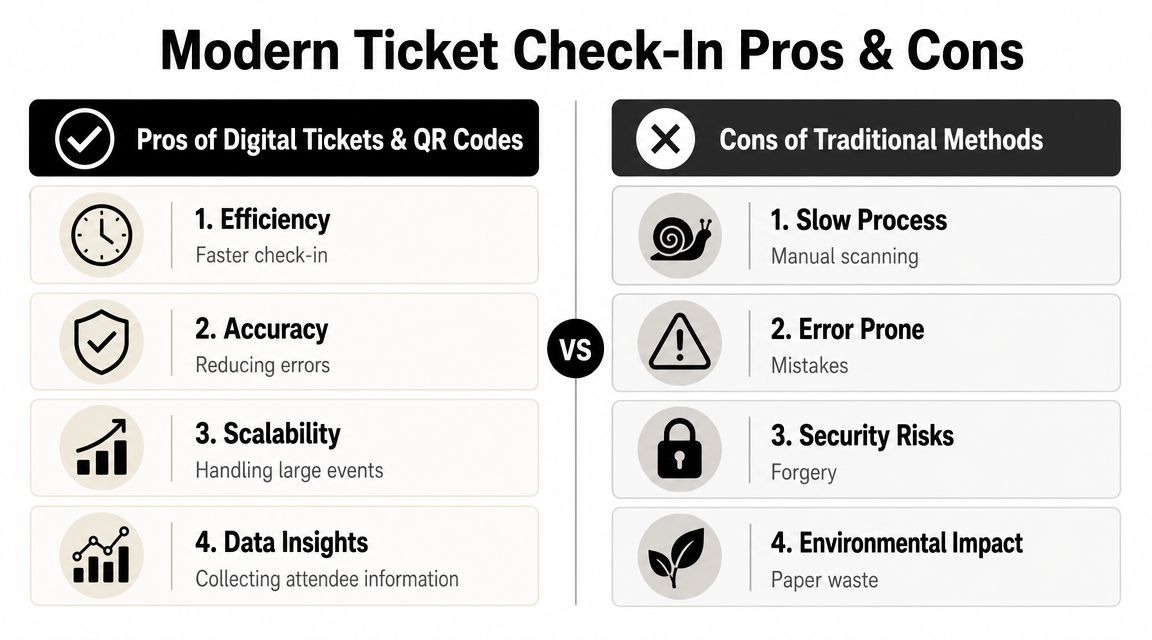
Sending tickets is only half the job. Entry control is where weak systems get exposed. A Google Docs ticket template can produce a clean PDF, but a printed list and a marker pen won't hold up well once arrivals bunch together.
Why paper-only check-in breaks down
Manual check-in creates friction in places that matter most:
- Lookup takes longer: Staff search names instead of validating a scan.
- Duplicate handling is weak: It's harder to know whether the same ticket has already been used.
- Status updates lag: Other staff can't instantly see who is already inside.
- Busy doors create mistakes: Fast queues lead to skipped marks and inconsistent handling.
That matters even more for concerts, school ceremonies, and mixed-access events where one person may be allowed into one area but not another. If you're also working on the attendance side of promotion and venue fill, this article from Paul Robins Promotions is a useful complement because it focuses on getting people through the full event pipeline, not just issuing a ticket.
What a workable check-in flow looks like
The stronger setup is simple. Staff scan the QR code with a phone, the system checks it against the Google Sheet, and the attendee record updates immediately. That gives you a live attendance picture and makes duplicate detection much more practical.
Look for these capabilities in a scanning setup:
Real-time sheet updates
The attendee row should reflect check-in status as scans happen.Multiple device support
More than one staff member should be able to scan at once.Offline tolerance
Venue Wi-Fi is often unreliable. Your process shouldn't collapse because the signal does.Clear scan feedback
Staff need obvious success and rejection messages. Ambiguity causes arguments at the door.
A dedicated event staff scanning app for Google Sheets workflows is the cleanest final layer when you want to stay inside the Google ecosystem but avoid the bottlenecks of manual admission.
When to Upgrade from a DIY Template
A Google Docs ticket template paired with Sheets can carry more weight than people expect. For a school performance, a community fundraiser, or a single-entry paid event, it can be fast, cheap, and reliable if the sheet structure is clean and the QR workflow is set up properly.
The limit shows up when the ticket itself stops being the hard part.
Once you need the system to handle sales, access rules, refunds, staff permissions, or live reporting for several stakeholders, a Doc-based workflow starts creating extra admin work. You can still force it to work, but the hours go into patching exceptions instead of running the event.
Signs the simple stack is no longer enough
Upgrade when your team keeps asking the spreadsheet to behave like ticketing software:
- Direct payment collection: Selling tickets through forms, payment links, and manual reconciliation is workable at low volume, but it becomes error-prone once transactions need to match ticket status automatically.
- Multiple ticket tiers: VIP, general admission, sponsor, crew, timed entry, and add-ons are manageable in Sheets up to a point. After that, field logic and conditional rules get messy fast.
- Complex access control: Multi-day passes, zone-based entry, workshop selection, and meal eligibility usually need validation at scan time, not just a note in one column.
- Reporting requirements: If organizers, finance staff, and front-of-house leads all need different live views, a DIY sheet often turns into a fragile reporting layer.
- Higher attendee volume: Bulk merges, email delivery, duplicate handling, and support requests are still possible in Google Workspace, but they stop being light admin work.
The practical test is simple. If staff have to ask, "Which tab is the correct one?" or "How do we handle this exception?" more than a few times during event week, the system is already under strain.
What to keep from your Google workflow
Even if you move to a more specialized setup, keep the structure that made the DIY version work:
- one attendee record per person
- consistent field names across forms, sheets, and tickets
- a unique ticket ID
- clear check-in statuses
- controlled ownership of the master list
That discipline matters because your Google Docs ticket template was never just a design file. The system comprised the combination of Doc layout, Sheet data, unique IDs, and QR-based validation. If you later switch tools, organized data makes migration much easier and reduces the cleanup work that usually slows teams down.
If you want to stay inside Google Workspace but need more than a basic Google Docs ticket template can provide, Darkaa is built for that middle ground. It turns Google Sheets and Google Forms into QR code ticketing, bulk distribution, and event check-in workflows without forcing your team into a separate dashboard, which makes it a practical next step when your DIY process is still working but starting to show strain.