You've agreed to help with a neighborhood fair, school fundraiser, church gathering, nonprofit open house, or local festival. At first it sounds manageable. Then the questions start piling up. Where should it happen? How many people are coming? Who's covering check-in? What if the weather turns? What if people register and don't show up?
That's where most first-time organizers get stuck. They don't fail because they care too little. They fail because community event planning looks simple from the outside and turns into operations work the moment a date is set.
The good news is that you don't need enterprise software, a giant staff, or years in the industry to run a solid event. You need a clear purpose, a realistic plan, a workable registration system, and day-of logistics that respect how real people attend events. Convenience matters. Communication matters. Accessibility matters more than many teams realize.
The most reliable community events are built from ordinary tools used well. A shared spreadsheet. A clean form. Clear roles. Confirmed vendors. A check-in flow that doesn't create a line out the door. That's the playbook.
Table of Contents
- From Idea to Impact
- Define Your Event's Purpose and Budget
- Build Your Master Plan and Secure Logistics
- Recruit and Manage Your Event Team
- Promote Your Event and Manage Registration
- Execute On-Site Logistics with True Inclusion
- Measure Success and Plan for the Future
From Idea to Impact
It usually starts like this. One person says, “Let's do a spring fair,” and within a week five different people are making five different events in their heads. The sponsor wants visibility. The principal wants families in and out by 3 p.m. Volunteers want something fun. Facilities wants a layout early enough to approve power, tables, and traffic flow.
That mix of priorities is normal. Trouble starts when nobody turns those competing expectations into decisions.
Strong community event planning is less about creativity than coordination. The job is to decide what kind of event you are running, what trade-offs you will accept, and what systems will keep the day under control. That is how small teams run events that feel polished without spending like a conference producer.
I have seen first-time organizers lose a month because they copied the wrong model. They planned a neighborhood resource fair like a fundraiser, or treated a family festival like a speaker event. The result is predictable. Registration asks the wrong questions, signage solves the wrong problems, staffing gets pulled to low-value tasks, and attendees feel the confusion the minute they arrive.
Good events feel easy because the hard choices were made early.
That includes your tools. You do not need expensive event software to run a professional check-in process for a school night, block party, volunteer day, or local fundraiser. A well-built Google Form feeding a shared Google Sheet can handle registration, confirmations, check-in tracking, dietary and access needs, and post-event follow-up at very low cost. Used well, that setup gives small organizations control without adding another subscription or training burden.
Accessibility belongs in that same planning mindset. It is not a box to tick after the venue is booked and the flyer is out. It affects registration questions, room setup, signage, pacing, microphone use, check-in flow, seating choices, and how staff respond when someone needs help. Inclusive events are usually better run events because they remove friction for everyone, not just attendees with disclosed needs.
Outside funding often adds another layer of pressure. Sponsors may want mentions, tables, or lead capture, and those requests can distort the event if nobody sets boundaries. Reviewing examples like SponsorRadar's creator insights can help you shape sponsor packages that support the event instead of hijacking it.
From there, the work stays simple on paper and demanding in practice:
- Make the event goal specific. A vague goal creates vague decisions.
- Choose the operating model early. Festival, meeting, fundraiser, workshop, and fair all run differently.
- Build one source of truth. One shared plan beats scattered texts and inbox threads every time.
- Use low-cost systems that staff can learn fast. Google Sheets and Forms are often enough.
- Plan for inclusion as an operations issue. Access, communication, and comfort need owners, not good intentions.
Handle those five areas well and the event will feel calm, clear, and welcoming, even with a small budget and a volunteer-heavy team.
Define Your Event's Purpose and Budget
At 7:30 a.m. on event day, the problems usually trace back to one decision that never got made early enough. Why are we doing this, and what can we afford to do well?

Start with the outcome, not the activity
First-time organizers often start by picking a venue, brainstorming entertainment, or designing a flyer. That feels productive. It usually creates rework.
A clear event purpose makes the rest of the planning smaller and sharper. "Build community" is too broad to guide decisions. A usable purpose names the audience, the action you want, and the result that matters after the room is empty.
Strong examples look like this:
- Recruit 25 new volunteers for a neighborhood garden
- Reconnect school families and collect updated contact details
- Raise funds for one defined program
- Introduce residents to city services and book follow-up appointments
- Launch a monthly gathering that brings people back again
That purpose should survive contact with real constraints. If the goal is relationship-building, a packed festival with loud music may work worse than a smaller hosted mixer. If the goal is lead capture for a service fair, free-flow traffic matters more than stage programming. Trade-offs get easier once the job of the event is stated plainly.
A simple worksheet keeps teams honest:
| Question | Strong answer | Weak answer |
|---|---|---|
| Why are we doing this? | Recruit new volunteers and reconnect existing supporters | Bring people together |
| Who is it for? | Parents of K to 8 students, neighbors, local supporters | Everyone |
| What action should people take? | Register, attend, donate, sign up, return next month | Have fun |
| What must be true at the end? | Staff captures contacts and follow-up interest | People seem happy |
Experienced planners measure more than turnout. They look at whether the event met its stated objective, whether attendees had a good experience, and whether the team stayed inside budget. Use those same three checks for a community event and post-event decisions get much easier.
Build the budget before you ask for quotes
The budget sets the shape of the event. It is not paperwork to clean up later.
Start with a shared Google Sheet. One tab for projected expenses. One tab for projected income. One tab for actuals as invoices and commitments come in. If you plan to sell tickets or collect RSVPs, keep the names and counts tied to that same system. A Google Form feeding into Sheets is often enough for registration, meal preferences, accessibility requests, comp tickets, and day-of check-in status. It is cheap, fast to train on, and reliable if one person owns the sheet.
For budget lines, separate fixed costs from costs you can scale:
- Site and facilities: Venue fee, tables, chairs, cleaning, security deposit
- Program costs: Speakers, performers, activity materials, supplies
- Operations: Signage, printing, volunteer shirts, radios, extension cords, batteries
- Food and hospitality: Catering, snacks, water, vendor meals
- Risk items: Insurance, permits, first aid supplies, weather backup
- Promotion: Design, printing, boosted posts, banners, community board materials
- Access costs: ASL interpretation, captioning, accessible transportation support, quiet space setup, large-print signage
That last category gets missed too often. Real accessibility needs a line in the budget and an owner on the plan. If access is treated as a last-minute add-on, teams either overspend in a rush or force attendees to work around preventable barriers. Better practice is simple. Ask about needs in registration, cost the likely supports early, and protect that money from being absorbed by decor or extras.
A few mistakes show up over and over:
- Hidden venue costs: Trash removal, overtime, staff access fees, kitchen fees, or required vendors change the total fast.
- Unconfirmed donations counted as revenue: A verbal yes is not money in hand.
- Underpricing operational labor: Every extra activity needs setup, supervision, signage, and cleanup.
- Skipping follow-up costs: Thank-you messages, survey incentives, and post-event reporting still take time and money.
One rule saves a lot of pain. If a line item creates work on event day, budget for the work, not just the object.
Sponsorship can help, but only if the package fits the event instead of distorting it. Local businesses respond better to a clear offer with defined visibility, audience fit, and deliverables than to a vague request for support. That is why resources like SponsorRadar's creator insights are useful when you are shaping sponsor packages.
Keep the first version simple. The goal is a decision tool, not a polished finance document. Once the purpose is clear and the numbers are grounded, the event becomes much easier to scope, schedule, and staff. A practical event logistics planning workflow for smoother execution can help translate those decisions into a workable plan.
Build Your Master Plan and Secure Logistics
Three weeks before the event, the room is booked, the flyer is out, and registrations look promising. Then the venue asks for proof of insurance, the accessible entrance turns out to be on the far side of the building, and nobody has decided how check-in will work if Wi-Fi drops. That is the point where a simple event starts feeling complicated.
Good logistics prevent that pileup. Once the purpose and budget are set, the job is to turn decisions into a schedule, a floor plan, and a set of operating rules that hold up under pressure.
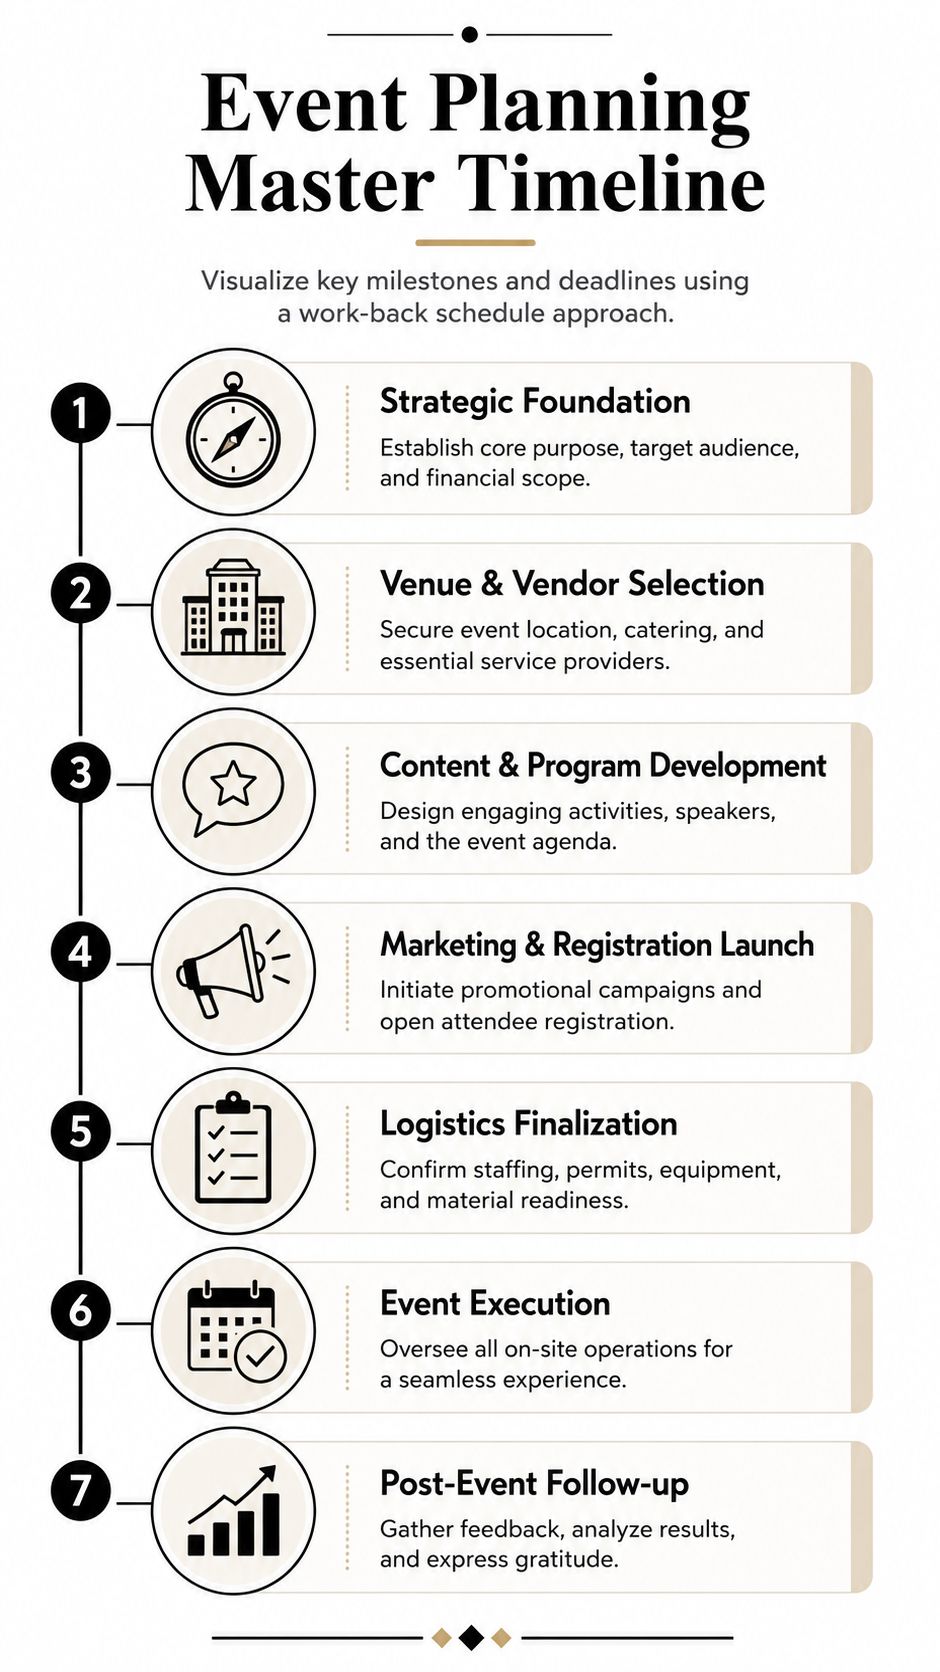
Work backward from the event date
Start with the event date and build the plan in reverse. It is still the most reliable way to catch what first-time organizers miss, especially approval lead times, print deadlines, and venue requirements that appear late.
I usually map this in one shared Google Sheet with four columns: task, owner, deadline, and status. Keep it plain. Fancy project software is unnecessary for a community event if the sheet is current and someone is accountable for each line.
A practical work-back timeline usually includes:
- Event date locked
- Venue contract signed
- Permits, insurance, and venue compliance items confirmed
- Room layout and accessibility plan drafted
- Vendors booked
- Registration and check-in workflow tested
- Promotion calendar live
- Volunteer schedule finalized
- Attendee instructions sent
- Day-of materials printed, downloaded, or backed up offline
- Post-event survey and follow-up draft prepared before event day
For a field-tested example of how to sequence these decisions, use this event logistics planning workflow for smoother execution.
Build logistics around attendee effort
Organizers often choose a venue based on price, charm, or familiarity. Attendees judge it by how easy it is to attend, enter, move through, and leave.
That changes the selection process. A lower rental rate can cost more if the site has poor transit access, confusing entrances, limited parking, or no realistic rain backup. A room that looks good in photos can still fail on acoustics, sightlines, restroom access, or stroller and wheelchair movement.
Check the venue in person if you can. Walk the route from curb to check-in table. Time the elevator. Stand where registration will happen and ask a basic question: can a first-time guest find everything without needing rescue?
Use simple criteria that reflect real behavior:
- Travel and arrival: public transit, parking, bike access, drop-off area, lighting after dark
- Wayfinding: visible entrance, readable signs, clear path to check-in, restrooms, and main activity areas
- Flow: enough space for lines, mingling, seating, and mobility devices without blocking doors
- Sound and visibility: speakers can be heard, screens can be seen, and side conversations will not drown out the program
- Weather plan: outdoor alternatives, covered waiting areas, heat or cold considerations
- Neighborhood context: competing local events, school pickup times, sports traffic, and noise restrictions
The best venue is usually the one that creates the least friction.
Treat accessibility as an operating plan
Accessibility should shape the event setup from the start, not get added after the room is booked. Compliance checklists help, but they are not enough on their own. People experience accessibility through dozens of small operational choices.
That means checking more than ramps and restroom labels. Look at seating flexibility, line length, captioning needs, scent exposure, quiet space, dietary labeling, mic use, lighting, and whether your registration form gives people a clear way to request support early enough for you to act on it.
This is also where low-cost tools help. A Google Form can collect access needs during registration, and a linked Google Sheet can sort responses by category so the operations lead sees patterns quickly. If five people request step-free access or two request large-print materials, that should change the room plan, signage prep, and staffing assignment before event day.
Useful questions include:
- Do you need step-free access at any point during the event?
- Do you have seating, sightline, or quiet-space needs?
- Do you need interpretation, captioning, or large-print materials?
- Do you have food allergies or dietary restrictions?
- Is there anything else that would help you participate fully?
Do not collect this information unless someone on the team reviews it and acts on it.
Lock down permits, safety, and failure points early
Permit and safety work tends to get delayed because it feels administrative. In practice, it controls whether the event can happen as planned.
Create one logistics document that answers the questions people ask under stress. Who calls the venue manager. Where weather updates get posted. What happens if a vendor is late. Which entrance attendees should use if the main one is blocked. Who has the first-aid kit. Where volunteers send someone who needs a quiet space or immediate assistance.
A simple version looks like this:
| Item | Owner | Deadline |
|---|---|---|
| Permit inquiry submitted | Event lead | Early in planning |
| Insurance requirements confirmed | Admin or board contact | Before vendor agreements |
| Site map completed | Operations lead | Before volunteer briefing |
| Accessibility requests reviewed | Operations lead | Before final layout |
| Emergency contacts list | Event lead | Before event day |
| Weather decision point | Event lead and venue | Predefined before launch |
| Check-in backup prepared | Registration lead | Before event day |
One failure point deserves extra attention. Check-in.
For small and mid-sized community events, a Google Form plus Google Sheet setup is often enough to run registration and check-in without buying a full event platform. Use the form to collect registrations, feed responses into a sheet, assign each attendee a simple reference ID, and create filtered views for check-in staff. On event day, one person handles arrivals, one handles problems, and one person has an offline copy in case reception fails. It is inexpensive, easy to train, and much more professional than searching through email confirmations at the door.
If something affects safety, movement, timing, or access, write it down, assign an owner, and test the plan before the doors open.
Recruit and Manage Your Event Team
No community event feels organized by accident. A team made it look easy.
I've seen tiny events run beautifully with a handful of people because each person knew their lane. I've also seen larger volunteer groups create confusion because everyone was “helping” but nobody owned anything specific.
Give people jobs not vague requests
“Can you help on Saturday?” sounds friendly, but it creates uncertainty. People don't know when to arrive, what they're doing, who they report to, or when they're done.
Give volunteers defined roles with start times, handoff points, and one supervisor. Even for a small event, separate the work into actual functions.
- Front door and check-in: Greets attendees, answers basic questions, handles name lookup issues.
- Floor support: Restocks materials, manages room flow, watches for bottlenecks.
- Program support: Helps speakers, activity leaders, or performers stay on time.
- Accessibility support: Responds to attendee requests, helps with seating or wayfinding, coordinates quiet-space needs.
- Pack-down crew: Handles breakdown, inventory, lost items, and site reset.
A volunteer orientation should be short and concrete. Don't give a motivational speech and call it training. Show people the map. Walk them through what to do if someone arrives without confirmation, if a vendor is late, or if a family needs assistance.
Volunteers stay calm when the plan answers the questions they'd otherwise ask under pressure.
A simple run-of-show sheet works better than a long handbook. Include names, phone numbers, arrival times, station assignments, escalation contacts, and the one thing each role should prioritize.
Manage vendors like partners with deadlines
Vendor issues usually come from assumptions, not bad intent.
The food truck assumes power is available near the curb. The photographer assumes they can arrive during setup. The rental company assumes your team will move furniture after drop-off. None of that belongs in guesswork.
Set expectations in writing. Even if you're working with friendly local businesses, confirm these points:
- Arrival window and setup deadline
- What they bring and what you provide
- Power, load-in, and parking details
- Primary on-site contact
- Payment timing
- Rain plan or cancellation terms
Vendors also need context. Tell them what kind of event this is, what the audience looks like, and what the pace of the day will be. A school fun run, a nonprofit gala, and a neighborhood resource fair all create different operating conditions.
One useful habit is a vendor confirmation round a few days before the event. Confirm arrivals, materials, contact numbers, and any special requirements. That one touchpoint catches missing certificates, changed menus, equipment surprises, and timing misunderstandings before they become front-of-house problems.
When people feel informed and respected, they usually perform better. That applies to volunteers as much as paid vendors. Community event planning gets easier when your team doesn't have to decode the plan on the fly.
Promote Your Event and Manage Registration
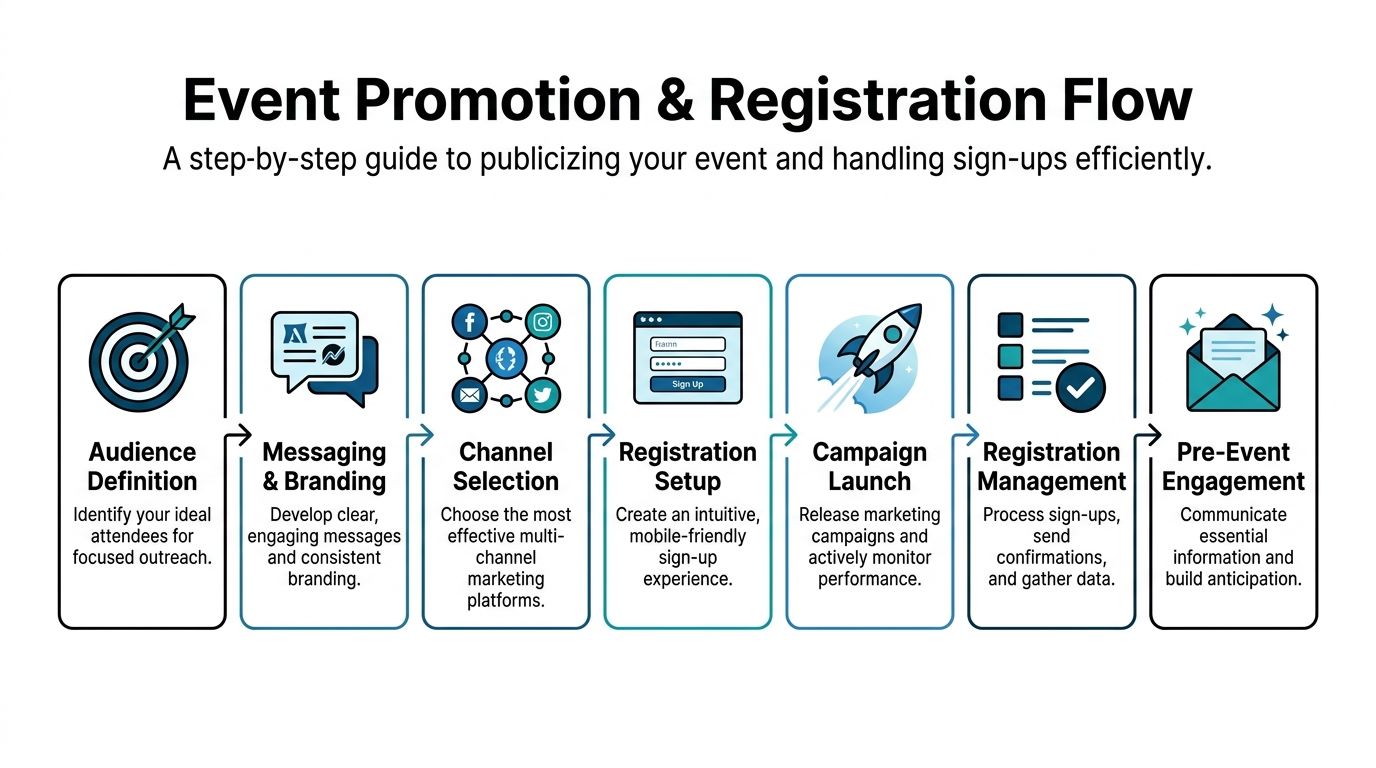
Registration opens on Monday. By Wednesday, you have 63 sign-ups, three questions about parking, two requests for large-print materials, and no clear way to tell who plans to show up. That is the point where promotion and registration stop being marketing tasks and start becoming operations.
Build a promotion plan your team can maintain
The best promotion plan is the one your team can keep up for three weeks without dropping it.
Small community events usually do better with a short channel list and repeated, clear messaging than with a long list of neglected accounts. Choose channels based on how your audience already gets information. Parent-heavy events usually respond to email, school newsletters, group chats, and printed reminders that make it home in backpacks. Neighborhood events often fill through local Facebook groups, partner organizations, library boards, faith communities, and posters in familiar places.
Keep the core message consistent every time someone sees it:
- What the event is
- Who should attend
- Why it matters
- When and where it happens
- How to register
- What access, cost, or participation details people should know before they commit
That last point gets missed often. If childcare is available, say so. If the venue has step-free entry, quiet space, interpretation, or transit access, put it in the first wave of promotion, not in a buried FAQ. Inclusive events get better attendance when people can tell early whether the event was designed with them in mind.
If you want a lightweight scheduling system for outreach, PostPlanify's event social media tools can help a small team queue posts and stay consistent without building a full campaign machine.
Use Google Forms and Sheets as your registration backbone
For many community events, Google Forms and Google Sheets are enough. The difference is in how carefully you set them up.
Only ask for information you will use. Every field should connect to staffing, space, communications, access, or follow-up. Name and email are standard. Phone can help with day-before reminders or weather changes. Guest count matters for seating and supplies. Session choice matters for room planning. Dietary and accessibility questions matter only if someone reviews them early enough to act.
A practical form setup often includes:
- A Google Form for registration
- A linked Google Sheet for live responses
- Separate tabs or filtered views for attendee types, sessions, volunteers, or VIPs
- A confirmation workflow tied to the response sheet
- A unique ticket or attendance ID for each registrant
This approach stays low-cost, shared, and easy to hand off. It also gives first-time organizers a professional system without forcing the whole event into software nobody on the team knows how to use. This guide to online event registration with a simple Google-based workflow is a useful reference if you want to keep registration manageable from the start.
One warning from experience. Do not treat accessibility fields as a box-checking exercise. If your form asks about interpretation, mobility access, sensory needs, dietary restrictions, or support for attendants, someone on your team must review those answers on a schedule and turn them into actions. A good registration form collects needs. A good event plan assigns them.
Turn sign-ups into confirmations, tickets, and realistic attendance estimates
A registration list is interest. Confirmed attendance is something closer to a planning number.
Free community events often see no-shows. Paid events can still have drop-off if reminders are weak, the venue is hard to find, or the weather shifts. Instead of relying on a fixed percentage, track your own pattern over time and plan conservatively for food, seating, and staffing. First-time organizers should expect some gap between registrations and arrivals, then improve forecasts after each event.
That is why confirmation messages matter. Send one immediately after sign-up so people know they are registered and have the right details. Send another reminder close enough to the event that they can still save the date, check transportation, and share changes with your team.
A low-cost workflow can look like this:
| Step | Tool | Why it matters |
|---|---|---|
| RSVP collection | Google Forms | Easy to complete on mobile |
| Response tracking | Google Sheets | Gives the team one shared list |
| Ticket generation | Sheets add-on | Creates one ticket per registrant |
| Confirmation send | Email or WhatsApp from sheet | Cuts confusion before event day |
| Door validation | QR scan tied to sheet | Records attendance cleanly |
For teams working inside Google Workspace, Darkaa is one option for turning Sheets and Forms data into tickets, sending them in bulk, and supporting QR code attendance for Google Forms through a connected check-in flow. That setup is useful when the priority is low cost, shared access, and simple training.
Send the first confirmation right away. Send the reminder when attendees can still act on it.
Done well, registration does more than count names. It gives you a usable attendee list, a cleaner accessibility workflow, and a check-in system your front desk team can trust.
Execute On-Site Logistics with True Inclusion
Doors open in ten minutes. A volunteer cannot find the printed guest list. Two walk-ins are asking where to pay. A parent with a stroller is blocked by a narrow check-in line. Someone who requested captioning is trying to confirm where to sit. Event day exposes weak systems fast.
That is why on-site execution needs two things working together. A check-in process the team can run under pressure, and an access plan that shows up in the room, not just in a planning document.
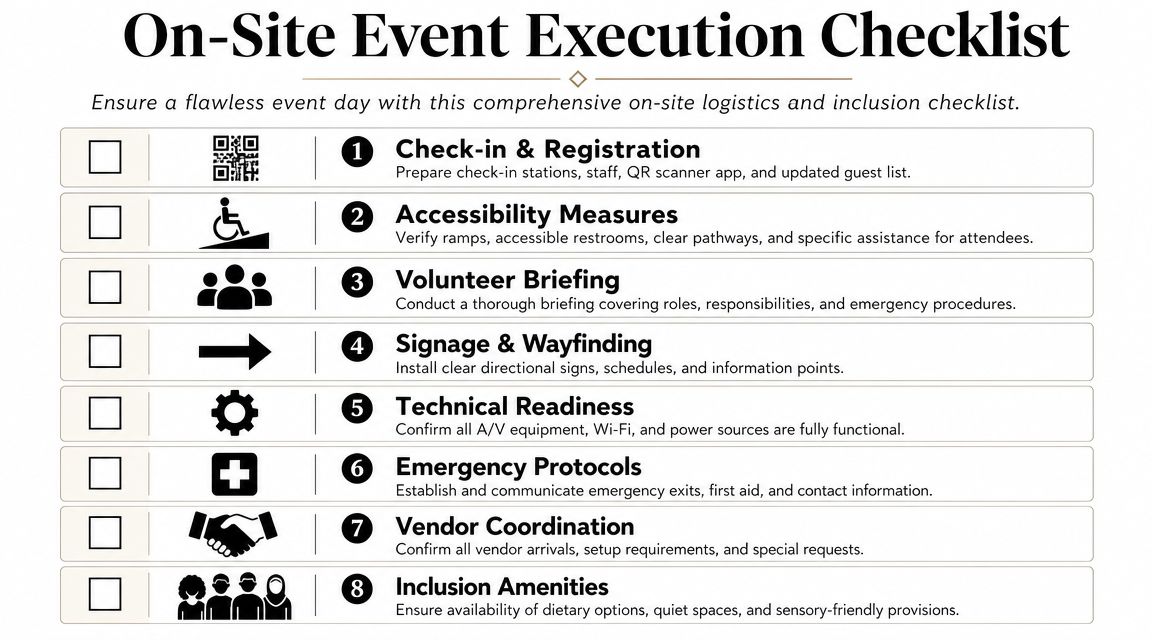
Make check-in fast, calm, and visible
The front door shapes the whole event. If people arrive to a confused line, missing signs, or volunteers who cannot solve exceptions, the room starts tense and stays that way.
Set up check-in based on attendee types, not wishful thinking. Separate lines often help: pre-registered guests, walk-ins, speakers, vendors, and volunteers. Put one experienced person in clear view with authority to fix problems on the spot. Scanning tickets is only part of the job. Someone also needs to handle duplicate registrations, misspelled names, accessibility notes, and payment questions without stopping the line.
If your attendee list lives in Google Sheets, staff can use a mobile workflow built around QR code ticket check-in for Sheets. That lets the door team scan tickets, validate entries, and sync attendance back to the sheet. For community venues with weak Wi-Fi, offline-capable scanning matters more than flashy features. If you want a benchmark for what turnout and no-show patterns typically look like, review these event attendance statistics and registration trends before you set staffing levels at the door.
This short demo shows the kind of check-in flow that reduces friction at the door:
A check-in station that works under pressure usually includes:
- Visible wayfinding: People should know where to queue before they reach the table.
- A live guest list and a printed backup: If a phone dies or signal drops, the line keeps moving.
- One exception handler: Do not make every volunteer improvise.
- Space to queue without blocking access routes: Leave room for wheelchairs, strollers, late arrivals, and people who need more time at the desk.
Inclusion is an operations choice
Accessibility work fails on event day when it stays abstract. The room either supports participation or it does not.
Cornell's guidance on accessible event planning practices at Cornell is useful because it puts responsibility on organizers to plan for physical, communication, and digital access in advance. That is the right starting point. Real inclusion usually goes further, based on your audience and venue. In practice, that can mean multilingual signs for the neighborhoods you serve, a quiet room for guests who need lower stimulation, flexible seating, clear behavior standards for staff and volunteers, and a help desk that people can find.
The trade-off is real. More inclusive events take more coordination, more briefing, and sometimes more floor space. They also produce a better event for far more people, including attendees who never submit a formal access request.
Use this as an operating checklist:
- Physical access: Check routes from parking or transit to the entrance, table spacing, restroom access, seating variety, and sightlines.
- Communication access: Use plain-language signs, readable schedules, large print where needed, and bilingual or multilingual materials when your audience requires them.
- Sensory access: Offer a quiet area, lower-stimulation seating, and advance notice about amplified sound, flashing lights, or crowded activities.
- Digital access: Make forms readable on mobile, provide captions when you are streaming or recording, and give remote attendees clear joining instructions.
- Support access: Train volunteers on how to respond respectfully, where to escalate issues, and how to help without making attendees explain themselves repeatedly.
For family-oriented gatherings or park events where equipment has to move across lots, grass, or uneven surfaces, practical setup choices matter too. Advice on making family events easier to manage can help teams think through transport and staging issues that affect both comfort and access.
Use a day-of floor plan, not just a run sheet
A run sheet covers timing. A floor plan shows whether people can use the space.
Mark the entrance, check-in, help desk, restroom routes, quiet space, first aid, water, stage area, food service, power points, and emergency exits. Then walk the venue from several attendee perspectives: arriving late, using a walker, pushing a stroller, managing limited English, or needing a low-noise place to reset. That walkthrough catches problems earlier than any planning call.
Assign one team member to roam during the event.
Their job is to spot friction before it turns into complaints. They should watch line buildup, room temperature, seating pressure, blocked pathways, unclear signs, and access points that are technically available but hard to use in practice.
Community event planning gets judged in these details. People remember whether entry felt orderly, whether support was easy to find, and whether the event felt like it was designed for them to belong there.
Measure Success and Plan for the Future
By the time the chairs are stacked and the group chat goes quiet, the useful work is not over. This is the point where a first-time organizer either captures lessons for the next event or loses them by the next morning.
Review the numbers that connect to your goal
Start with the outcome you set at the beginning. If the event was meant to recruit volunteers, measure volunteer interest and sign-ups. If it was meant to connect neighbors, look for signals that people stayed, participated, and came back into your orbit afterward. A general sense that the event felt good is helpful, but it is not enough to guide the next budget or format decision.
The Castle Group advises organizers to compare results against their objectives and review practical metrics such as attendance, registration, budget performance, social media engagement, and post-event survey feedback in the same evaluation cycle. Their summary of what makes or breaks an event is a useful baseline for community teams that need a simple review process.
In practice, I look at a short set of measures first:
- Registrations versus actual check-ins
- No-show rate
- Participation by activity, session, or table
- Budget versus actual spend
- Volunteer, staff, and vendor feedback
- Attendee survey responses, especially repeated complaints or repeated praise
If you ran registration, ticketing, and check-in through Google Forms and Sheets, this review gets much easier. You can sort attendance by time, compare registrations to arrivals, and flag drop-off points without cleaning data from multiple tools first. For small teams, that low-cost workflow is often the difference between doing a real review and skipping it.
Capture what the numbers miss
Attendance matters. It just does not tell the whole story.
Community events often succeed or fail in slower ways: whether attendees felt welcome, whether accessibility support worked in practice, whether volunteers want to return, whether partner groups trust you enough to collaborate again. Those are not soft extras. They shape turnout, reputation, and staffing at the next event.
Write down specifics while the day is still fresh. Keep it to one or two pages. Include what you planned, what occurred, where the schedule slipped, what created lines, what confused people, and which accessibility choices worked well or fell short. Note the problems that made people work harder than they should have, such as unclear signage, noisy check-in, missing seating options, or staff not knowing who could solve a request.
That last piece matters more than many organizers expect. Accessibility should be reviewed as an operating system issue, not a compliance box. Ask whether people could enter, check in, hear, participate, rest, ask for help, and leave with dignity. If the answer was mixed, fix that before you spend more money on promotion.
For teams that want to compare one event against the next, this guide to attendance statistics that help evaluate event performance is useful because it focuses on patterns over time, not just total turnout on one day.
Decide what happens next
Close the review with a decision. Repeat the format, revise it, shrink it, split it into smaller gatherings, or stop doing it.
That choice should come from evidence, not habit. Some events draw a crowd but drain the team, miss the target audience, or create access problems that are expensive to patch later. Others look modest on paper but build strong repeat attendance, stronger partner relationships, and a better volunteer bench. Those are often worth keeping.
If you want a low-cost way to run registrations, send tickets, and track check-ins inside tools your team already uses, Darkaa is built for that workflow. It turns Google Sheets and Forms into a QR ticketing and attendance system, which is especially useful for community organizers who need structure without adopting a full new event platform.