
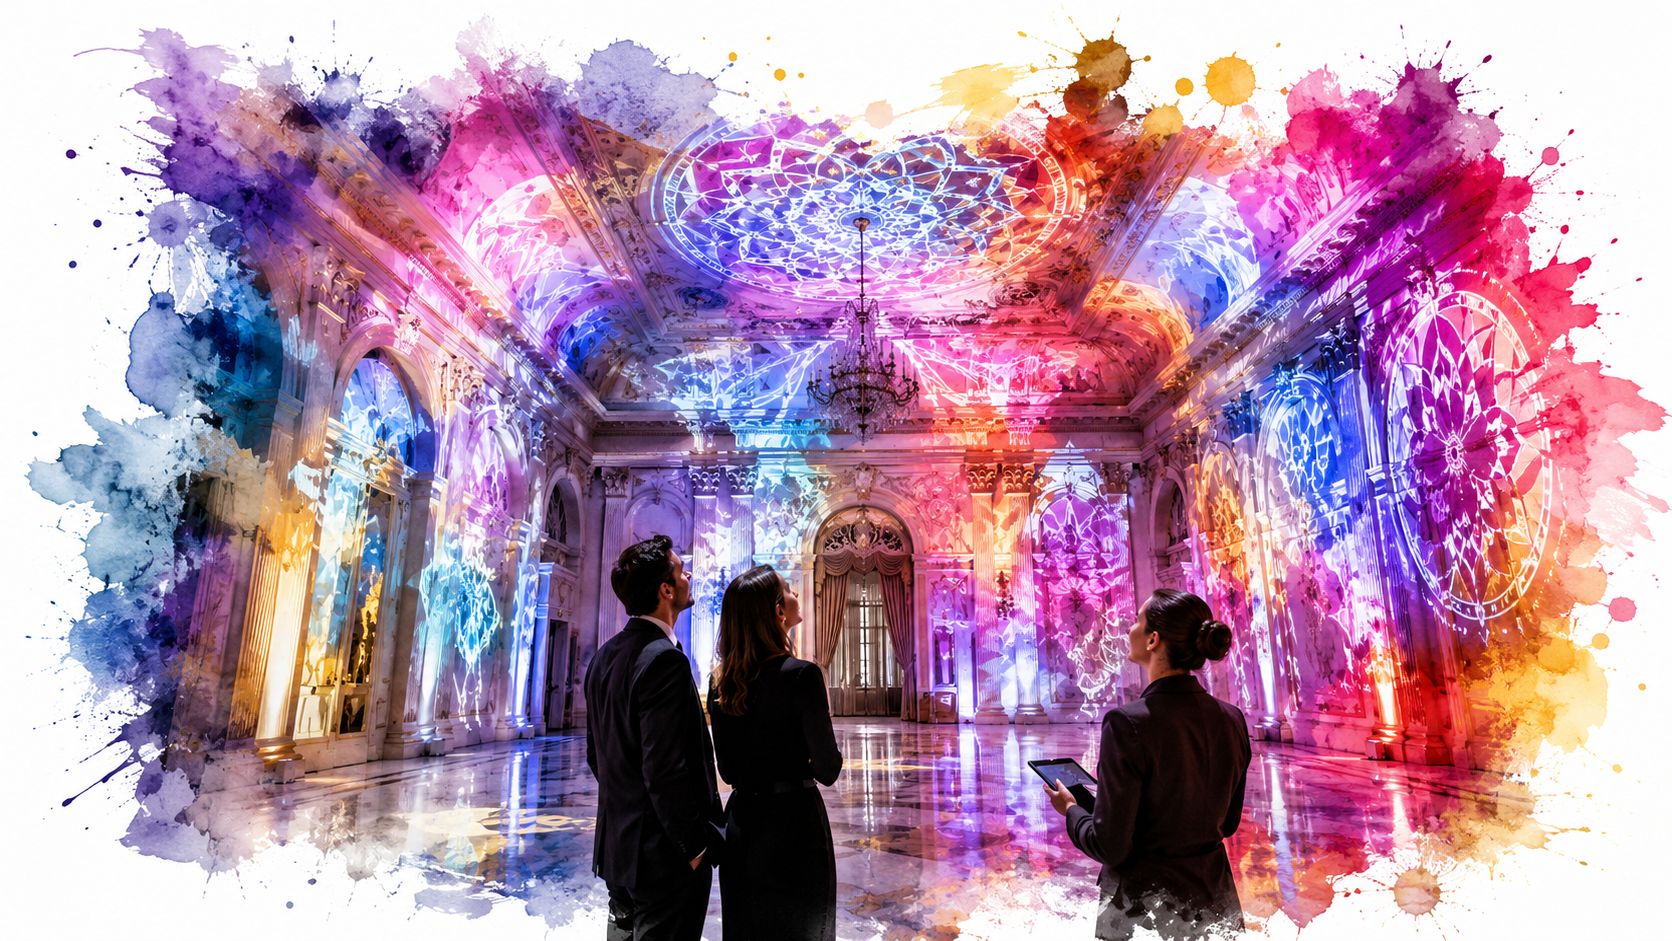
You're probably looking at a space right now that feels ordinary on paper and expensive in person. A ballroom with beige walls. A museum gallery with one feature wall. A building facade that's impressive in daylight but disappears after sunset. You want guests to walk in and feel that the room itself is part of the story, not just a container for screens, lights, and staging.
That's where the right projector for video mapping changes the conversation. Instead of hanging one more display, you turn the venue itself into the display. Columns become animated. A stage set appears to crack open. A product reveal lands with more impact because the light is shaped to the object, not just thrown at a rectangle.
For planners and venue teams, that sounds creative. It is. But it's also operational. A weak projector, the wrong lens, a rushed calibration window, or bad mounting can undo the whole effect fast. The buying decision isn't really about picking a projector from a spec sheet. It's about choosing a setup that fits your venue, your schedule, your content, and your risk tolerance.
Table of Contents
- Transforming Spaces with Light
- What Makes Video Mapping Projection Unique
- The Five Critical Projector Specs for Mapping
- Advanced Features for Complex Setups
- The Software and Calibration Workflow
- Mounting Environment and Logistics
- A Smart Buying Guide for Planners and Venues
Transforming Spaces with Light
A good mapping show doesn't feel like someone brought in a projector. It feels like the architecture woke up.
In a ballroom, that might mean projecting animated textures across ceiling coffers and wall panels so the room changes mood between keynote, dinner, and awards. In a courtyard, it might mean using the facade as a giant canvas for a launch sequence. At a wedding, a plain white cake table can become part of the visual storytelling instead of dead space in the room.
The appeal is simple. Projection mapping lets you get more atmosphere from surfaces you already have. That's useful when the venue has strict decor limits, when freight is tight, or when you want a premium look without filling the floor with physical scenic pieces.
I've seen planners get stuck thinking the projector is just an A/V line item. It isn't. It behaves more like scenic infrastructure. If the image lands cleanly, the room feels designed. If it misses edges, looks dim, or drifts out of alignment, guests notice even if they can't explain why.
A mapping setup succeeds when the audience stops thinking about equipment and starts reacting to the space.
That's why reference projects matter. If you want to see how teams approach creating immersive XR experiences for institutions, look at the way projection, architecture, and visitor movement work together. The lesson isn't just visual style. It's that technical choices support the final experience.
For an event planner, the practical question is this. What kind of projector setup gives you that transformation without creating a load-in nightmare, a power problem, or a blurry image nobody can photograph well?
What Makes Video Mapping Projection Unique
Standard projection is off the rack. Video mapping is customized.
A normal projector throws a rectangular image onto a flat screen or wall. That's fine for slides, logos, and playback. Video mapping does something different. It aligns imagery to the actual shape of a surface, whether that surface is a facade, sculpture, stage set, car, or ceiling detail.
Why a basic projector setup falls short
Consider an analogy with clothing. A standard projection screen is a jacket in one common size. Video mapping is a fitted suit made for one person's shoulders, arms, and posture. The content has to match the object. The projector has to hit the object from the right angle. The software has to warp the image so the audience sees it as intentional instead of distorted.
That's why office projector logic often fails in event mapping. In a boardroom, a little keystone correction might be acceptable. On a product reveal or venue facade, that same shortcut can make edges miss trim lines, windows, or scenic seams.
Another useful term here is spatial augmented reality. It sounds academic, but the idea is easy. You're adding digital imagery to a physical object using light, not a headset. The wall stays a wall. The object stays real. Light adds the illusion.
The historical shift that changed the medium
One of the earliest widely cited milestones came in 1969, when Disneyland's Haunted Mansion used projection mapping to cast ghostly faces onto physical busts, which marked a shift from flat-screen projection to surface-aware display. Later histories note that the approach gained broader popularity in the 1990s and early 2000s under labels such as video mapping and spatial augmented reality, as described in this history of projection mapping.
That history matters because it explains the buying mistake many teams make. They shop for a projector as if they're buying a presentation tool, when they're really building a surface-specific illusion system.
Practical rule: If the audience should feel that the object itself is moving, changing, or opening up, you're not shopping for a generic presentation projector anymore.
Once you look at mapping this way, the specs start to make more sense. Brightness isn't just brightness. It's whether the illusion survives room light. Throw ratio isn't just a lens number. It determines whether the projector can physically live where your venue allows it.
The Five Critical Projector Specs for Mapping
A projector spec sheet can read like a gear catalog. An event planner needs something more useful. You need to know which numbers affect the show, the install plan, and the guest experience.
For mapping, start with five specs. Brightness, contrast, resolution, throw ratio, and lens shift or lens flexibility. These are the numbers that decide whether the illusion reads clearly on the surface you have, in the room you have, with the rigging positions you can use.
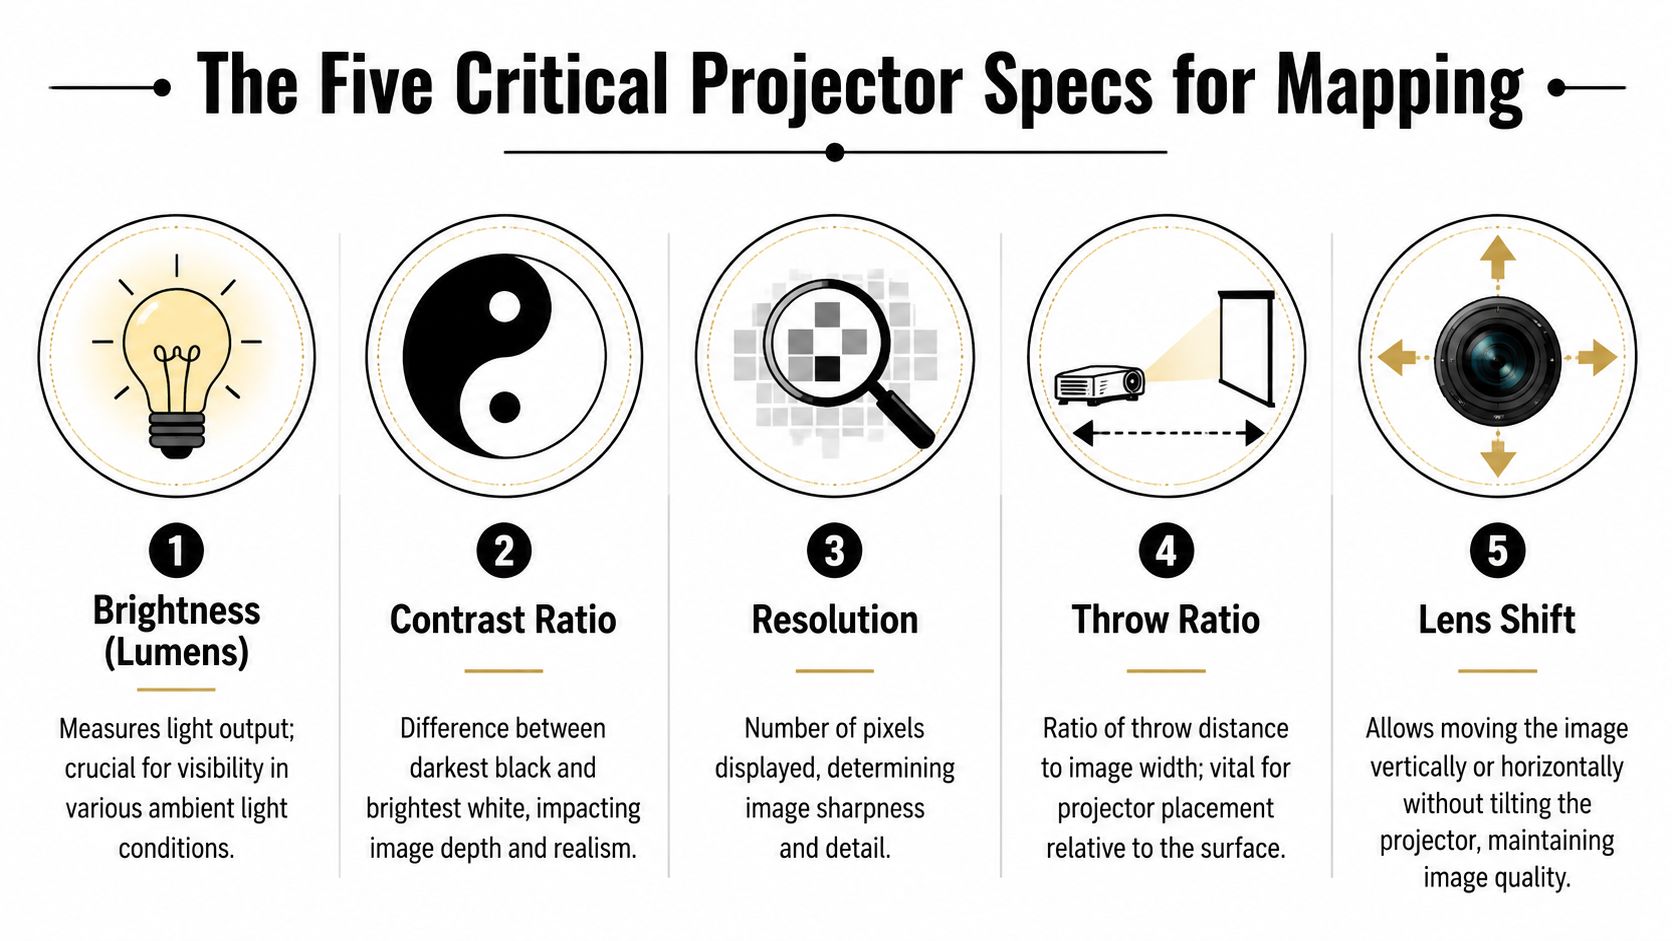
Brightness decides whether the concept survives the room
Brightness is measured in lumens. For mapping, it is often the first filter because every other image improvement depends on having enough light reach the surface in the first place. Epson explains in its projector brightness guide that ambient light has a direct effect on how bright a projected image appears, which is why the same projector can look strong in a blacked-out room and weak in a sunlit venue.
Lumens work like audio headroom at an event. In a quiet breakout room, a modest speaker can sound fine. Add crowd noise, HVAC rumble, and a cocktail hour next door, and that same speaker suddenly feels too small. Projection behaves the same way. Room light, decorative sconces, LED walls nearby, and even white table linens all compete with your image.
That is why planners should ask three questions before approving content or budget:
- How much ambient light will still be present during show time?
- How reflective is the target surface?
- Will the projection need to hold up in photos and video, not just to the eye in the room?
A dim image can still look acceptable during rehearsal. It often falls apart once guests enter, doors open, practical lights come up, and cameras start exposing for faces instead of scenery.
Resolution and contrast decide how believable the surface looks
Resolution controls how much detail the projector can draw. Fine architectural edges, small text, layered textures, and close viewing all expose softness quickly. If the audience will be far back and the content style is bold and graphic, resolution matters a bit less than brightness and lens fit.
Contrast controls separation between light and dark areas. That matters in mapping because the surface is already adding its own texture, color, and imperfections. If contrast is weak, shadows look muddy, highlights lose punch, and the mapped object stops feeling dimensional.
Photography gives a good comparison here. Resolution is how sharp the image is. Contrast is how clearly the shadows and highlights separate. A sharp but low-contrast image still looks flat. A high-contrast image with too little resolution can look coarse or soft around edges. Mapping works best when both support the content style and viewing distance.
Throw ratio determines whether the projector can live where the venue allows
Throw ratio tells you how large an image the projector can make from a given distance. A guide from Waves System gives a simple example. A projector with a 1.5:1 throw ratio placed 6 metres from the surface produces an image 4 metres wide, as shown in this video mapping projector guide.
That one calculation affects more planning decisions than many buyers expect. It tells you whether the projector can sit on a rear riser, fit on a balcony rail, clear audience sightlines, or hide on truss without ending up in the wrong place for the image size you need.
Unexpected complications often drive up event plan costs. The creative team approves a mapped area. Then the venue reveals a shorter room, a chandelier, a camera platform, or a no-rig zone. Suddenly the projector needs a different lens, a different mount point, or an additional unit. Throw ratio is not just a lens number. It is a logistics number.
Lens shift and lens flexibility give the crew recovery options
Real venues rarely offer a perfect centerline position. A projector may need to sit high, off to one side, or between other fixtures. Lens shift helps by moving the image without forcing the projector body into an awkward tilt, which preserves image geometry and makes alignment easier.
Interchangeable lenses matter for multi-use venues and touring setups. One ballroom may have a long throw from the back wall. The next show may need a short throw from truss because the room is shallower or the audience is denser. A projector that accepts different lenses gives the venue team more ways to reuse the same hardware instead of buying a different projector for every room type.
A laser light source also deserves attention here because it affects operations, not just picture quality. Laser models tend to provide more stable output over time and reduce lamp-change maintenance, which is helpful for venues running repeated installs or planners managing tight setup windows.
A quick field checklist helps keep these choices grounded:
- Brightness: Match it to room light, surface reflectivity, and camera expectations.
- Resolution: Spend here if content has fine detail or the audience will view it up close.
- Contrast: Protects depth and separation on textured or imperfect surfaces.
- Throw ratio: Confirm it before creative approvals, because placement limits come first.
- Lens shift and lens options: Give the crew practical ways to solve bad mounting positions.
If the projector cannot produce the right image from a position the venue can actually support, it is the wrong projector, even if the spec sheet looks impressive.
Advanced Features for Complex Setups
Once the core specs are right, the next question is whether the projector can solve awkward real-world problems. Complex mapping jobs rarely happen on one clean wall with one perfect mounting position. They happen on curved scenery, layered stage sets, shallow rooms, historic interiors, and facades with architectural interruptions.
When the surface isn't simple
The first feature to look for is geometric correction, often called warping. This lets the team bend and reshape the projected image so it fits the target surface. If you're projecting onto an arch, a cylindrical column, or an uneven scenic piece, warping is what makes the image appear straight and intentional to the audience.
A related feature is lens shift. It doesn't replace good placement, but it gives the crew some breathing room. Instead of tilting the whole projector and creating image distortion, lens shift moves the image position while keeping the projector body stable.
That matters when the venue gives you bad options. Maybe there's a chandelier where you wanted the projector. Maybe a balcony edge blocks the ideal angle. Maybe a truss bay is already crowded with lighting fixtures. A mapping-ready projector gives the crew more ways to recover.
When one projector isn't enough
Large surfaces often need multiple projectors. That introduces a second challenge. You don't just need coverage. You need the images to feel like one continuous canvas.
That's where edge blending comes in. Each projector overlaps slightly with the next, and the system softens that overlap so the audience doesn't see a bright seam or a hard line. On a wide facade or immersive room, edge blending is the difference between “one giant image” and “a row of projectors trying their best.”
Connectivity also starts to matter more in bigger setups. Professional crews often want signal paths that are more stable over long runs than a simple consumer cable setup. The reason isn't glamour. It's reliability. The farther your projector is from playback and control, the more your signal plan becomes part of the show design.
Use advanced features as a problem solver list:
- Projecting on curves: prioritize strong warping tools.
- Building one unified image: make sure edge blending is supported.
- Mounting off-center: lens shift becomes valuable.
- Running long cable paths: confirm the projector fits the signal workflow your A/V team prefers.
A planner doesn't need to operate these features personally. But you do need to know when your concept depends on them, because that changes equipment choices, setup time, and who you hire to run the system.
The Software and Calibration Workflow
A projector can be perfect on paper and still fail on site if the workflow is sloppy. Mapping is half hardware and half alignment process. The projector throws the light, but software decides where every pixel should land.
Early in planning, it helps to think of mapping as a chain. First, someone measures or models the surface. Then the creative team builds content to fit that shape. Then the operator uses mapping software to line the digital version up with the physical one. If any link is rushed, the illusion breaks.
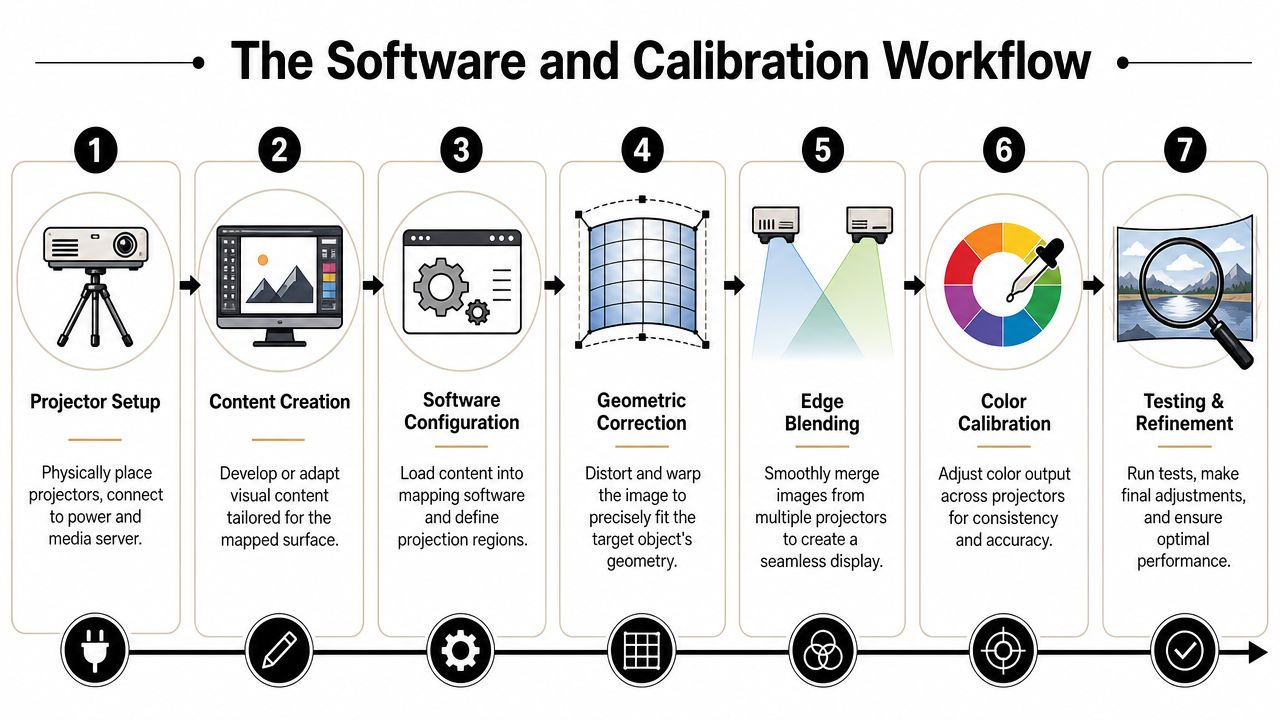
What the team builds before show day
The first step is understanding the surface. Sometimes that's a simple mask made from dimensions and photos. Sometimes it's a more detailed 3D model. A flat wall with trim lines is one thing. A sculptural installation with depth, recesses, and protrusions is another.
Then the creative team builds content for that surface. At this stage, planners often underestimate the difference between “video content” and “mapping content.” A standard promo reel may look great on a monitor and wrong on a facade. The content has to respect edges, openings, and viewing angles.
For playback and alignment, teams often use tools such as Resolume, MadMapper, or TouchDesigner. Each has its place. What matters most for the planner is less the brand name and more the staffing implication. If your concept depends on custom warping, multiple outputs, or interactive behavior, you need an operator who knows the software well enough to make quick corrections under pressure.
A broader event systems view also helps. If your team is coordinating timed reveals, check-in waves, room turns, and multiple departments, it's worth reviewing how event logistics software fits into the production plan so media, access, and operations aren't running on separate islands.
What happens on site
On site, the crew places the projector, projects a test grid, and begins lining image geometry up with the physical object. They adjust corners, edges, masks, and internal points until content sits where it should.
Then comes refinement. If there are multiple projectors, the operator blends overlaps. If one projector is slightly warmer or cooler than another, they work on color matching. If the scenic team shifts a piece after the initial alignment, calibration may need to be revisited.
This video gives a useful visual sense of how that alignment process feels in practice.
The biggest schedule mistake in mapping is treating calibration like a final button press. It's a setup phase that needs real time and physical access.
A simple planning sequence looks like this:
- Confirm the final surface so content isn't built to outdated dimensions.
- Place and secure the projector before fine alignment starts.
- Load the mapped content into the software environment.
- Project a test pattern and adjust geometry to the surface.
- Blend and color-match if multiple projectors are in play.
- Run the actual show content and inspect from audience viewpoints.
- Lock the setup so nothing shifts before doors open.
If you understand that workflow, you'll make better calls on rehearsal windows, access times, crew schedules, and who needs to be in the room when changes happen.
Mounting Environment and Logistics
Doors open in 90 minutes. The content is finished, the projector is bright enough on paper, and the mapping looked sharp during prep. Then a ladder gets nudged, a catering light stays on near the stage, and the only power drop close to the rig is already feeding audio. Suddenly the problem is no longer the projector. It is the plan around it.
That is why mounting and site logistics deserve the same attention as specs. A projector for video mapping behaves a lot like a camera on a long exposure. If the position shifts even slightly, the whole image misses its mark. If stray light enters the scene, contrast falls. If access is poor, a five-minute adjustment turns into a production delay.
The checklist planners should ask early
A useful venue walk is less about admiring the room and more about stress-testing the workflow. Your A/V team will want clear answers to questions like these:
- Where can the projector mount? Truss, ceiling point, balcony rail, platform, or a custom enclosure all change sightlines, throw distance, and safety planning.
- Can the mount stay untouched once aligned? A small bump can pull content off architectural edges or scenic seams.
- How much ambient light remains during show time? House lights, bar lighting, LED walls, and decorative fixtures all compete with the projected image.
- What power is available near the mounting point? Short, planned runs are easier to protect and troubleshoot than improvised cable paths.
- Can crew reach the projector after focus and alignment? If the unit is over a staircase, above audience seating, or behind scenic pieces, every correction costs more time and labor.
- What is the audience view? A projector can fit physically and still be wrong if it creates shadows, visible fan noise, or a distracting beam path.
These questions matter because they shape labor, schedule, and risk. A hard-to-reach projector may still work technically, but it changes the staffing plan. A mount point with a perfect angle may still be a poor choice if it requires a lift every time someone needs to refocus. For planners juggling vendors and deadlines, that trade-off is often more important than a small gain on a spec sheet.
If your team needs a broader framework for dependencies, timing, and vendor handoffs, this guide to event logistics planning is a useful companion. Projection mapping rarely fails on one dramatic mistake. It usually slips because rigging, power, content, and venue operations were planned in separate lanes.
Power communication deserves attention too. On mixed crews, one vendor's shorthand for cabling may not match another's. A shared reference like DLG Electrical's wiring colour guide helps keep power conversations clear, especially on temporary installs where speed can tempt people to assume instead of confirm.
Indoor vs outdoor projection mapping needs
Outdoor mapping raises the stakes because the environment keeps pushing back. Indoors, you can often dim the room, shorten throw distance, and control who gets near the equipment. Outside, you deal with façade texture, spill from streetlights, longer cable runs, weather protection, security barriers, and access windows that may depend on permits or traffic control.
A simple way to frame the difference is this: indoor installs usually reward precision, while outdoor installs demand resilience. A ballroom projector might be chosen because it fits a clean ceiling mount and can be serviced quickly during rehearsal. A façade projector may need more brightness, a longer-throw lens, a weather-rated enclosure, and a placement strategy that survives wind, public traffic, and limited setup hours.
| Factor | Indoor (e.g., Ballroom, Exhibit) | Outdoor (e.g., Building Facade, Festival Stage) |
|---|---|---|
| Ambient light | Often controllable | Hard to control and often changing |
| Surface consistency | Usually smoother and cleaner | Often textured, darker, or uneven |
| Mounting | Easier to rig securely | More exposure to distance and weather |
| Access | Faster adjustments | Access can require lifts, barriers, or permits |
| Protection | Standard handling may be enough | Weatherproofing and temperature management matter more |
| Brightness pressure | Moderate in dark rooms | Much higher because the environment fights you |
The practical lesson is straightforward. Choose a projector that fits the site, then choose a site plan that protects the projection. Good mapping comes from both. If the environment works against you, the crew spends the event compensating for preventable problems instead of running the show with confidence.
A Smart Buying Guide for Planners and Venues
A planner gets two quotes for a mapping project. One projector looks stronger on paper. The other fits the room, the rigging plan, and the crew's setup window. In real events, the second quote often delivers the better show.
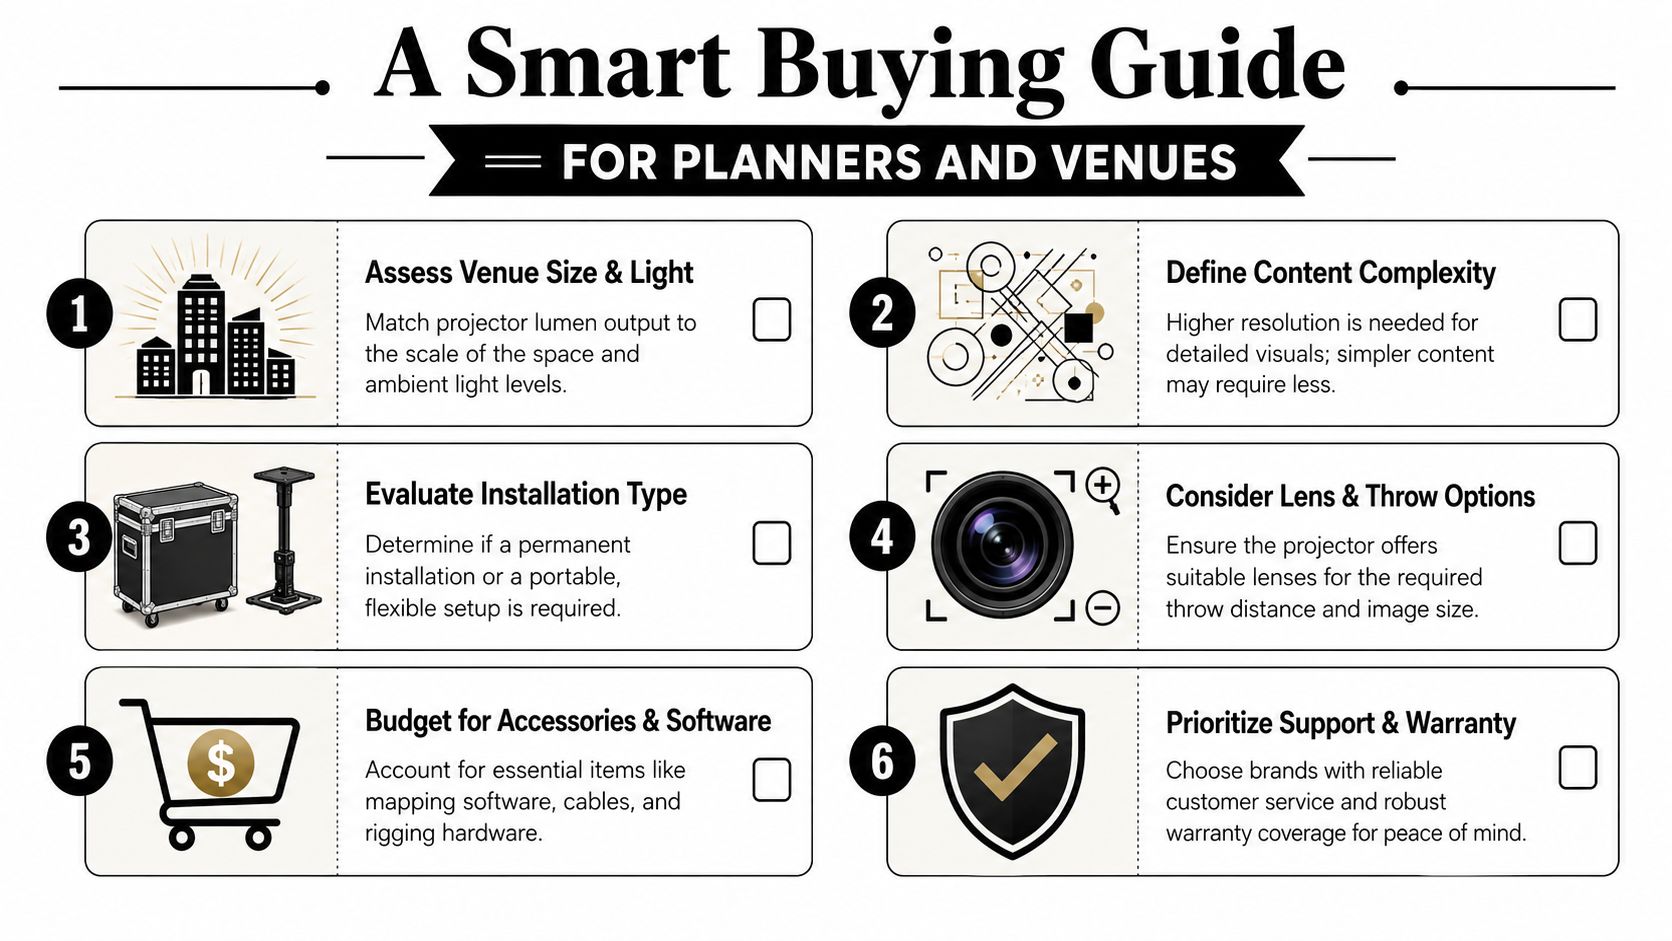
Buying for video mapping works best when you start with the event outcome, then work backward into the equipment. A projector is only part of the system. The right choice depends on how long the install stays up, how often the content changes, how much rehearsal time you have, and whether your staff can repeat the setup without guesswork.
Three common buying paths
For a small permanent installation, favor a projector that can stay aligned and produce the same image day after day. A laser light source helps because it reduces lamp changes and keeps upkeep more predictable. The goal in a museum, lobby, or branded display is consistency. You want the projector to behave like house lighting. Always ready, easy to maintain, and unlikely to drift between presentations.
For a portable corporate setup, the best projector is usually the one your crew can move, mount, align, and strike without turning load-in into a bottleneck. Moderate brightness can be enough in controlled interiors, and lens flexibility often matters more than chasing the highest spec. A ballroom setup that starts on time is usually more valuable than extra output you cannot fully use.
For a large impact activation, such as a facade reveal or festival set piece, your buying logic changes. Brightness, interchangeable lenses, edge blending, and operator familiarity all affect whether the show feels polished or fragile under pressure. Teams planning audience-facing brand moments often review examples of Experiential Marketing Activations because the projection has to support the full experience, including sightlines, timing, and crowd flow.
Projection also has to fit the rest of venue operations. If your team is comparing scheduling tools, staffing plans, and event workflows, venue management software for scheduling and operations can help keep projection planning connected to the wider event plan instead of becoming its own isolated task.
Rent or buy
Buy when the projector will serve a repeatable use case. That usually means the room geometry stays fairly consistent, your team has time to learn the software, and the equipment will be used often enough to justify maintenance, storage, and training.
Rent when the brief changes from event to event. That is often the better call for one-off launches, seasonal installs, or shows that need specialty lenses and higher brightness only a few times a year. Renting can also reduce risk if your team is still learning what your venue needs.
A practical buyer's checklist looks like this:
- Match brightness to the actual room or site
- Match throw distance to where the projector can really be mounted
- Match resolution to the content, viewing distance, and audience expectations
- Match software features to the complexity of the show
- Match ownership cost to how often the system will be used
- Match crew skill level to the calibration and playback workflow
The best projector for video mapping is the one that fits your surface, your schedule, and your staff. A spec sheet may win the comparison. A well-matched system wins show day.
If you're planning events where guest flow matters as much as visual impact, Darkaa helps teams run QR code ticket check-in for Sheets, QR code attendance for Google Forms, and branded ticketing workflows inside Google Workspace. That's useful when you want projection, access control, and on-site operations to feel organized from the first invite to the final scan.